
Products are the heart of every online store. If you just opened a new store, the first thing you will do is add your products, and most of them come in more than one size or color. In this tutorial, we will learn Shopify how to add products step by step, and then how to add variants (size, color, material…) so customers can pick the exact version they want.
Shopify’s product editor looks simple, but there are a few things that confuse new merchants: where to set a different price for one size, why a variant shows “Sold out”, or why a product does not appear on the storefront. I will cover all of them in this guide.
If you have worked with Magento before, you will notice the workflow is very different. In Magento you usually create attributes and configurable products first, or bulk import products into Magento 2 with a CSV file. In Shopify, everything happens on one product page.
Here is an overview of what we are going to do:
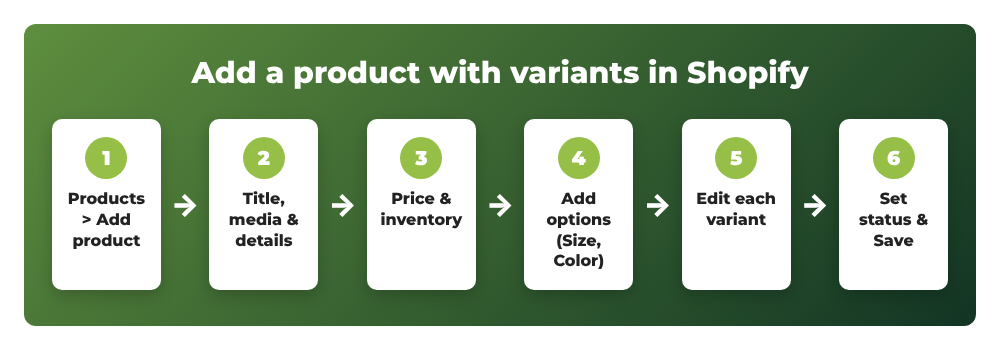
Contents
- Before you start: Shopify product and variant limits
- Step 1: Open the Add product page
- Step 2: Enter the product title, description and media
- Step 3: Set the price, inventory and shipping
- Step 4: Add variants (options like size or color)
- Step 5: Edit the price, SKU and inventory of each variant
- Step 6: Set the status, sales channels and organization, then save
- How to add many products at once
- Common errors when adding products and variants
- Wrapping up
Before you start: Shopify product and variant limits
Let’s quickly review a few limits so you can plan your catalog:
- Each product can have up to 3 options (for example Size, Color and Material).
- Each product can have up to 2,048 variants. Shopify raised the old 100-variant limit to 2,048 for all merchants.
- Each product can have up to 250 media files, and each variant can use one image from the product’s media.
- Some older themes, apps and sales channels may not fully support products with more than 100 variants, so test your product page after saving.
A variant is one combination of option values. For example, a T-shirt with 3 sizes (Small, Medium, Large) and 2 colors (Black, White) has 3 x 2 = 6 variants. Each variant can have its own price, SKU, barcode, weight and inventory quantity.
Step 1: Open the Add product page
Log in to your Shopify admin, then go to Products and click the Add product button in the top-right corner.
You will see an empty product form. The main column contains the title, description, media, pricing, inventory, shipping and variants. The right column contains the product status, publishing (sales channels) and product organization (type, vendor, collections, tags).
Step 2: Enter the product title, description and media
Fill in the basic product information:
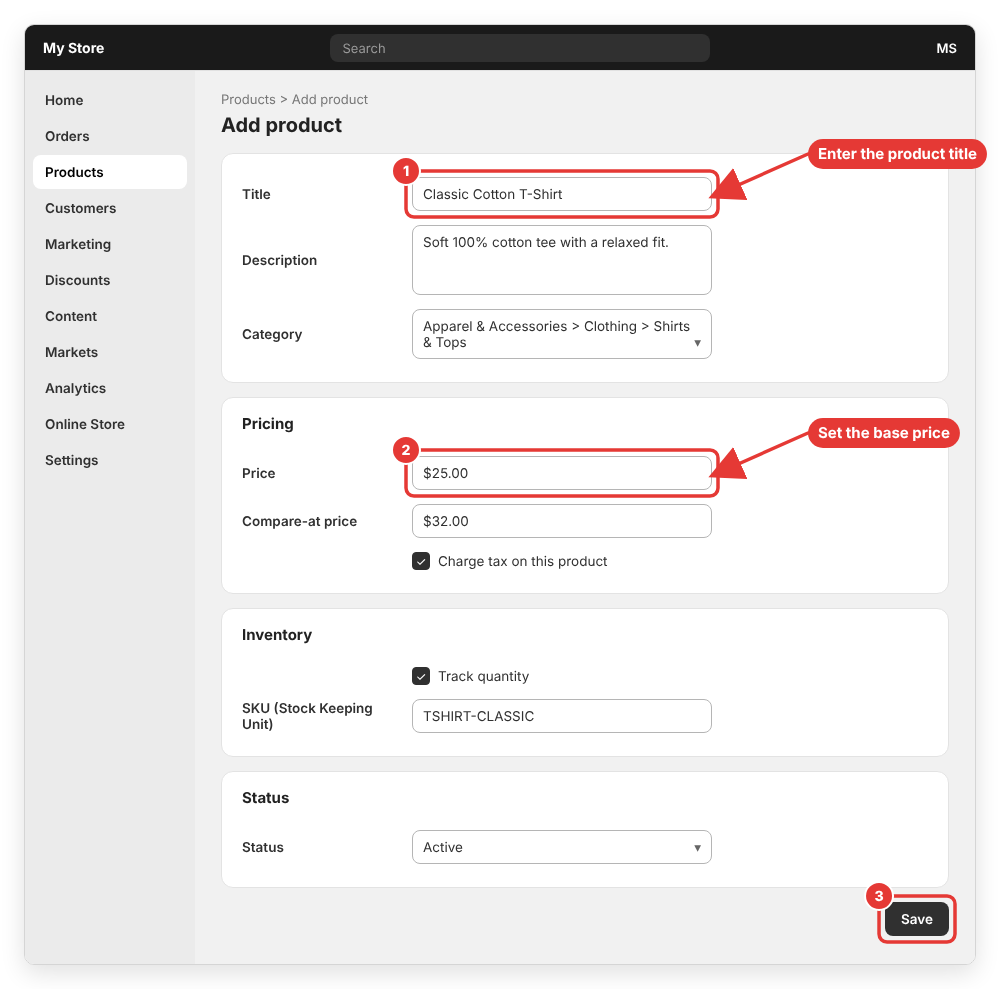
- Title: the product name, for example
Classic Cotton T-Shirt. Keep it short and descriptive because it is also used for the default URL handle. - Description: describe the material, fit, care instructions and what makes the product special. You can format the text with headings and lists.
- Media: click Upload new or drag and drop your images, videos or 3D models. The first image becomes the main product image.
- Category: choose a category from Shopify’s standard product taxonomy (for example Apparel & Accessories > Clothing). The category helps with taxes, marketplaces and category metafields.
Step 3: Set the price, inventory and shipping
Scroll down to the Pricing section:
- Price: the selling price, for example
25.00. - Compare-at price: optional. If it is higher than the price, most themes show the product as on sale with the old price crossed out.
- Charge tax on this product: keep it checked unless the product is tax-exempt.
- Cost per item: optional, but useful because Shopify uses it to calculate your margin and profit reports.
In the Inventory section, check Track quantity if you want Shopify to count your stock, then enter the quantity for each location. You can also enter the SKU (Stock Keeping Unit) and Barcode (ISBN, UPC, GTIN, etc.). If you allow customers to buy the product when it is out of stock, check Continue selling when out of stock.
In the Shipping section, keep This is a physical product checked and enter the product weight. Shopify uses the weight to calculate shipping rates at checkout, so don’t leave it at 0 if you use weight-based or carrier-calculated rates.
Tip: once you add variants in the next step, the price, SKU, inventory and weight are managed per variant instead of on the product level.
Step 4: Add variants (options like size or color)
Now let’s turn our single product into a product with variants. Scroll to the Variants section and click + Add options like size or color.
- In the Option name field, enter the name of the option, for example
Size. - In the Option values section, enter each value in its own field:
Small,Medium,Large. A new empty field appears automatically after you type a value. - To add a second option, click + Add another option and repeat, for example
Colorwith the valuesBlackandWhite. - Click Done, then click Save.
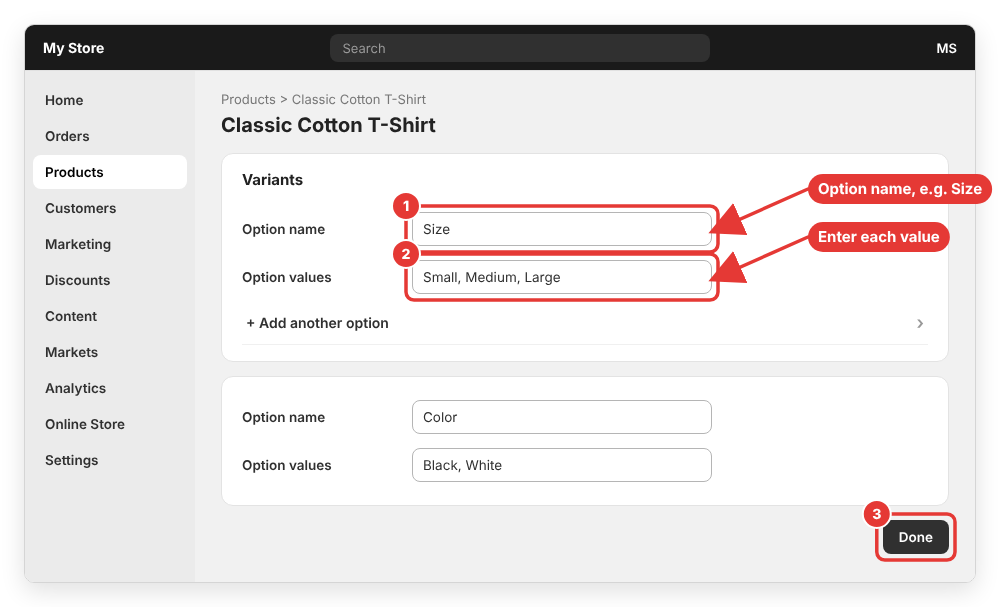
Shopify automatically creates every combination of your option values. In our example, we now have 6 variants: Small / Black, Small / White, Medium / Black, Medium / White, Large / Black and Large / White.
If you use a color option, Shopify may suggest a category metafield for colors (for example when the product category is clothing). Linking the option to that metafield lets compatible themes display color swatches instead of plain text buttons.
Step 5: Edit the price, SKU and inventory of each variant
After saving, the variants appear as a list in the Variants section. By default, all variants inherit the price you entered earlier. To change them:
- Use Group by to group the list by one option (for example by Size), then edit the price or quantity of the whole group in one place.
- Click a single variant to open the variant details page, where you can set its own Price, Compare-at price, SKU, Barcode, Weight, inventory quantities and variant image.
- To edit many variants at once, select them with the checkboxes and choose a bulk action (for example edit prices or quantities) from the toolbar.
For example, larger sizes often cost more to produce, so I set the Large variants to 27.00 while Small and Medium stay at 25.00.
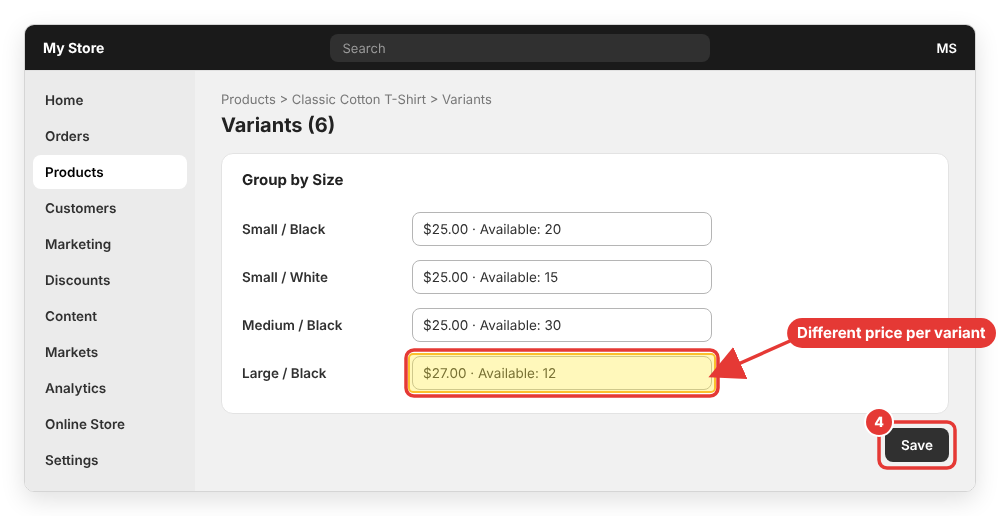
Don’t forget to click Save after editing your variants.
Add a new value or a single variant later
Your product line changes over time. To add a new size later, click Edit next to the option in the Variants section, type the new value in Add another value (for example XL), click Done and then Save. Shopify creates the new combinations automatically.
If you only want one specific combination (for example XL only exists in Black), click Add variant, enter the option values for that variant and click Save. You can also open an existing variant and click Duplicate, change one option value and save.
Delete a variant
If you no longer sell a combination, select its checkbox in the variant list and choose Delete variants from the bulk actions. If you only ran out of stock temporarily, it’s better to keep the variant and let it show as sold out, so customers know it will come back.
Step 6: Set the status, sales channels and organization, then save
Before you leave the page, check the right column:
- Status: choose Active to sell the product, or Draft if you are not ready yet. Draft products are hidden from all sales channels.
- Publishing: make sure Online Store (and any other channel you use) is selected.
- Product organization: fill in the Type, Vendor, Collections and Tags. Automated collections often use these values, so filling them now saves time later.
- Search engine listing: click the pencil icon to edit the Page title, Meta description and URL handle for SEO.
Click Save. Your product is now live. Open it on your storefront and test that every variant can be selected and added to the cart.
How to add many products at once
Adding products one by one is fine for a small catalog. If you have hundreds of products, use the product CSV import instead: go to Products, click Import, upload your CSV file and preview it before importing. Each variant is one row in the CSV, and rows with the same Handle belong to the same product. You can also use the bulk editor to edit prices, SKUs and quantities of many products in a spreadsheet-like view.
Common errors when adding products and variants
The product doesn’t show on the online store
Check three things: the Status is Active, the Online Store channel is selected under Publishing, and the product is added to a collection or menu that customers can reach. If your store is still password-protected, only you can see it.
A variant shows “Sold out”
When Track quantity is enabled and a variant has 0 available at the locations that fulfill online orders, the theme marks it as sold out. Add stock to that variant, or check Continue selling when out of stock.
I can’t add a fourth option
Shopify allows only 3 options per product. If you need more choices (for example engraving text), use line item properties through your theme or a product options app, or split the product into separate products.
Variant image doesn’t change on the product page
Make sure you assigned an image to each variant on the variant details page, and that your theme supports variant images. Most modern Online Store 2.0 themes switch the main image automatically.
Shipping rates are wrong at checkout
Usually the variant weight is 0 or the product is not marked as a physical product. Open each variant and set the correct weight.
For the full list of options, see the official Shopify Help Center guides on adding and updating products and adding variants.
By the way, if you compare this to Magento, variants there are built from configurable product attributes, and a missing attribute value often leads to the error “attribute value is empty, must be set“. In Shopify, options are created directly on the product, so you don’t need to prepare attribute sets first.
Wrapping up
That’s it! In this tutorial, we learned how to add products in Shopify, set their price, inventory and shipping weight, add options like size or color to create variants, and edit each variant’s price and stock. Once your products are ready, the next steps are organizing them into collections and adding them to your store’s navigation menu.
If you have any questions or run into a problem while adding products or variants, feel free to leave a comment below and I will help you out.
