
A customer orders the wrong size, a payment looks suspicious, or a parcel arrives damaged. Sooner or later every store owner has to cancel an order or give money back. In this tutorial, we will learn how to cancel and refund an order in Shopify step by step: canceling an unfulfilled order, issuing a full refund, issuing a partial refund, refunding only the shipping fee and restocking the items so your inventory stays correct.
Previously, I published a tutorial on how to add products and variants in Shopify. If you track inventory on those products, the restock options in this guide will put the items back into your available stock automatically.
Here is an overview of the whole process:
Contents
- Cancel vs refund in Shopify: what is the difference?
- Step 1: Check permissions and the order status
- Step 2: How to cancel an order in Shopify
- Step 3: How to refund an order in Shopify (full refund)
- Step 4: How to issue a partial refund in Shopify
- Step 5: Refund only the shipping cost
- Step 6: Restock items without refunding
- Archive or delete a canceled order
- Transaction fees and refund timing
- Common errors
- Wrapping up
Cancel vs refund in Shopify: what is the difference?
Before we click anything, it helps to understand that Shopify treats these as two different actions:
- Cancel order stops the order completely. It is meant for orders that you will not ship, for example when the customer changed their mind, the item is out of stock or the order is fraudulent. While canceling, you can refund the payment, restock the items and notify the customer in one go. A canceled order cannot be fulfilled.
- Refund gives money back but keeps the order. You use it when the order is already fulfilled (shipped), when only some items are returned, or when you want to give back part of the shipping fee. You can issue several partial refunds on the same order until you reach the order total.
A simple rule: if nothing has been shipped yet and you won’t ship it, cancel. If something has been shipped, or the customer keeps part of the order, refund.
Step 1: Check permissions and the order status
To cancel or refund, you need to be the store owner or a staff member with the right Orders permissions (for example Refund to original payment method and Refund to store credit). If the buttons are missing, ask the store owner to update your staff permissions.
Next, open the order from Orders in the Shopify admin and look at its status:
Unfulfilled– you can cancel it.Partially fulfilled– Shopify won’t let you cancel it. Cancel the fulfillment first, or refund the remaining items instead.Fulfilled– use a refund (and a return if the customer sends items back).
Step 2: How to cancel an order in Shopify
Follow these steps on desktop:
- From your Shopify admin, go to Orders and click the order you want to cancel.
- Click More actions > Cancel order.
- In the Refund payment section, choose one option:
- Original payment method – a full refund goes back to the card or wallet the customer paid with.
- Store credit – the full amount is issued as store credit (you can set an expiry date).
- Later – cancel now and decide about the refund later.
- Select a Reason for cancellation from the drop-down and, optionally, type an internal Staff note.
- Leave Restock inventory checked if you want the items to go back into stock (it is checked by default).
- Leave Send a notification to the customer checked to email the customer about the cancellation.
- Click Cancel order.
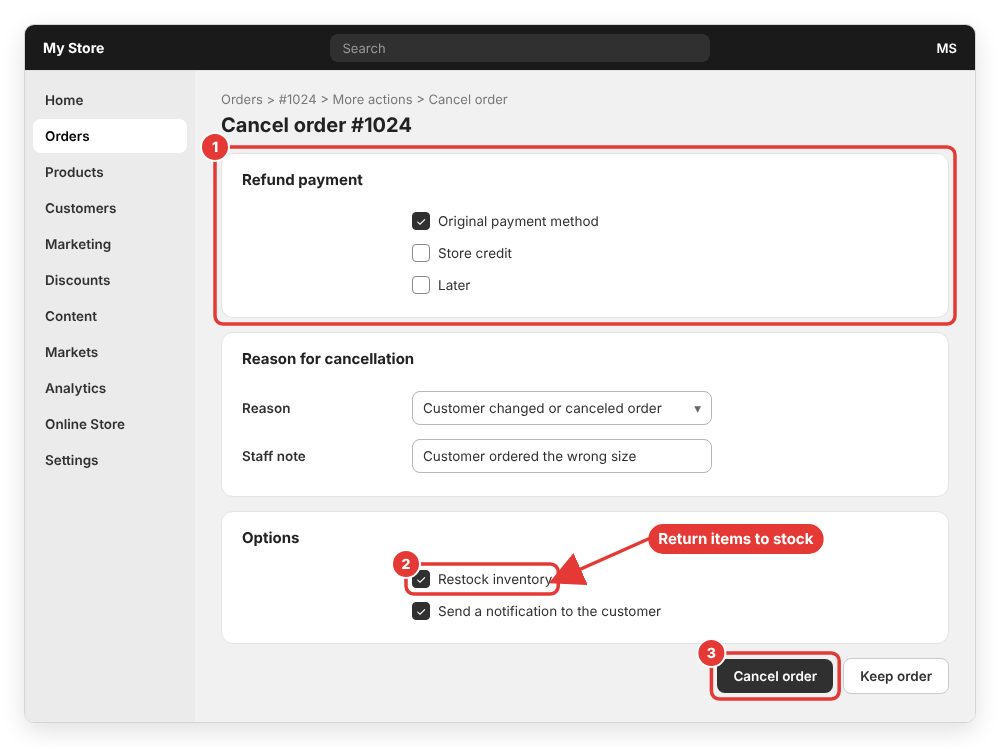
After canceling, check the order Timeline: Shopify records the cancellation, the refund and the restock there. An uncaptured payment becomes Voided, and a fully refunded payment becomes Refunded.
Cancel multiple orders at once
You can bulk-cancel up to 250 orders: in Orders, tick the checkboxes next to the orders, open the more actions menu and choose Cancel orders. Be careful here – according to Shopify, the Refund payment prompt may not appear in bulk, and all selected orders can be refunded immediately, including orders that were already refunded. If any order is already refunded or you want to choose Later, cancel those orders one by one.
Step 3: How to refund an order in Shopify (full refund)
Use this when the order has already been fulfilled, or when you want to refund without canceling:
- Go to Orders and click the order.
- Click Refund.
- Enter the quantity to refund for each item. For a full refund, enter the full quantity of every line item.
- Keep Restock items selected if the items come back to you in sellable condition. This option only appears for products with inventory tracking.
- In the Refund shipping section, enter the shipping amount you want to give back.
- Optionally type a Reason for refund. This is an internal note and is not shown to the customer.
- In the Summary, choose the Refund method (original payment method, store credit or both) and check the Refund amount.
- Leave Send a notification to the customer checked, then click Refund.
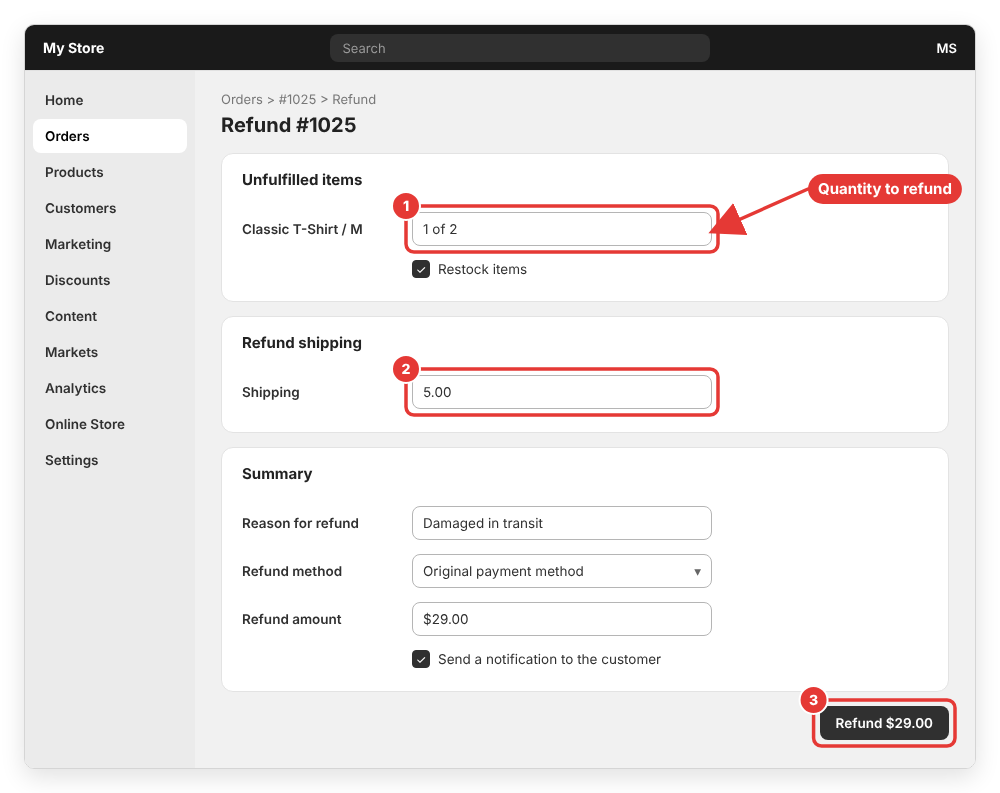
Important: once you click Refund, it cannot be canceled or reversed from the admin. Double-check the amount before you confirm. If you refund by mistake, the only fix is to create a new draft order and collect the payment again.
Step 4: How to issue a partial refund in Shopify
A partial refund is the same screen as above with a smaller amount:
- To refund one item out of several, enter a quantity lower than the ordered quantity (for example
1of2). Items with quantity0are not refunded. - To give a goodwill discount instead of refunding the full item, click the item price on the refund page, choose a Discount type, enter the value and click Save.
- You can repeat partial refunds until the order total is reached. The payment status changes to
Partially refunded.
If the customer paid partly with a gift card, Shopify suggests refunding to the gift card first and the rest to the other payment method. You can adjust the split manually in the Summary section.
Step 5: Refund only the shipping cost
Sometimes the order arrives late and you just want to give back the shipping fee:
- Open the order and click Refund.
- Leave all item quantities at
0. - In Refund shipping, enter the amount (it can’t be higher than the shipping you charged).
- Click Refund.
Note that you can’t refund shipping on an order that used an order-level free shipping discount, because the customer paid nothing for shipping.
Step 6: Restock items without refunding
If a customer returns an item but was already refunded (or the payment was never captured), you can still fix your inventory. Open the order, click Restock, enter the quantities and click Restock items.
If the customer is sending products back, it’s better to create a return first and then refund it, so the return reason is recorded in your reports. Text typed in Reason for refund is only an internal note.
Archive or delete a canceled order
Canceled orders stay in your admin. To clean up the list, open the order and use the Archive action (in the More actions menu). Archived orders appear under the Closed view.
Deleting is much more limited. Shopify only lets you delete test orders, orders paid with a manual payment method, draft orders marked as paid and orders imported through the API – and the order must be archived or canceled first. Normal paid orders can’t be deleted because they are part of your financial records. If you come from Magento, this is a big difference: in Magento you can delete orders in Magento 2 with an extension, but in Shopify archiving is the normal way to hide finished orders.
Transaction fees and refund timing
- With Shopify Payments, credit card processing fees are not returned to you when you refund an order.
- With a third-party payment gateway, the gateway’s own fees stay with the gateway. Shopify transaction fees are only credited back in some cases (when Shopify Payments isn’t available in your country and you refund through the Shopify admin).
- Shopify sends the refund to the payment provider right away, but the time it takes to appear on the customer’s statement depends on their bank or card issuer. If the customer no longer has the original card, they need to contact their bank to claim the money.
Common errors
The “Cancel order” button is missing
This usually means the order can’t be canceled in its current state. Check the order Timeline for the reason. Typical causes:
- The order is
Partially fulfilled– cancel the fulfillment first, or refund the remaining items. - The order is handled by a third-party fulfillment service – cancel it in that service first.
- The order came from an app or sales channel that manages its own cancellations (for example some Facebook/Instagram orders or third-party app orders).
- The order is already canceled.
- Your staff account doesn’t have the needed Orders permissions.
The customer was refunded twice
This happens most often with bulk cancellation of orders that were already refunded, or when canceling an order after losing a chargeback. In those cases, cancel the order individually and choose Later under Refund payment so Shopify doesn’t send another refund.
Inventory is wrong after a refund
If you unchecked Restock items by mistake, open the order and use Restock to add the quantities back. Remember that restocking only works for products with inventory tracking turned on.
The customer disputes the full amount after a partial refund
A customer can still open a chargeback for the whole order. When that happens, submit evidence of the partial refund (order link, amounts, refund date) from the chargeback page in your admin before the deadline.
For the full list of rules, see the official Shopify Help Center articles on canceling orders and refunding orders.
Related: how to change the shipping address on a Shopify order.
Wrapping up
That’s it! Now you know how to cancel and refund an order in Shopify: cancel unfulfilled orders with More actions > Cancel order, use Refund for fulfilled orders, partial refunds and shipping refunds, and always keep an eye on the restock checkbox so your inventory stays accurate. Just remember that a refund can’t be undone, so double-check the amount before you click.
If you have any questions or run into a different error while canceling or refunding a Shopify order, feel free to leave a comment below and I will try to help.