
Every Shopify store needs a few pages that are not products or collections: an About us page, a Contact page, a FAQ, a shipping policy or a size guide. Sooner or later you will also want one of those pages to look different from the others, for example an About page with images and testimonials instead of plain text. In this tutorial, we will learn how to add pages in Shopify, how to create a new page template in the theme editor, how to assign a template to a page, and how to show the page in your store menu.
Previously, I published a tutorial on how to change fonts in Shopify. Once your typography is ready, adding the basic pages is the natural next step in building your storefront.
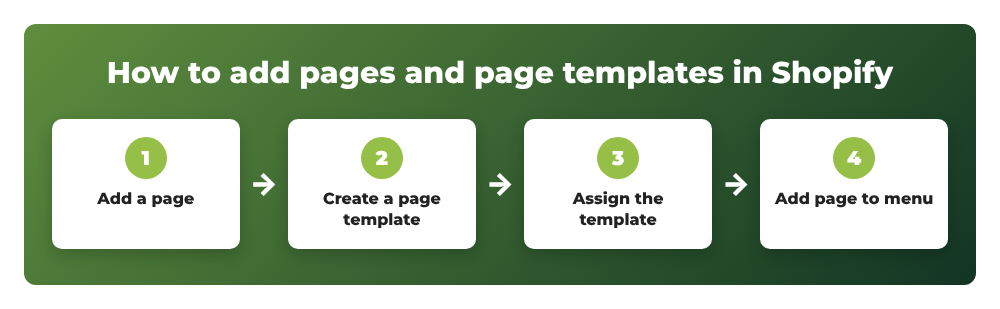
Here is an overview of what we are going to do:
Contents
Pages vs page templates in Shopify
Before we start, it helps to understand two terms that are often confused:
- Page – the content itself (title, text, images, SEO). Pages are created in the Shopify admin under Online Store > Pages.
- Page template – the layout that controls how a page is displayed: which sections appear, in what order, and with what settings. Templates are part of your theme and are created in the theme editor.
By default, every page uses the Default page template, which shows the page title and the content you typed in the admin. Most themes also include a contact template that adds a contact form. When you need something more, you create a new template and assign it to the page. Multiple templates are supported for products, collections, pages, blogs and blog posts, with a maximum of 1,000 templates per theme.
Step 1: How to add a page in Shopify
- From your Shopify admin, go to Online Store > Pages.
- Click Add page.
- Enter a Title, for example
About us. The title is shown at the top of the page and in browser tabs. - Type your text in the Content box. The rich text editor lets you add headings, links, images, videos and tables. If you prefer HTML, click the code button (
<>) in the editor toolbar to edit the HTML directly. - In the Visibility section, keep Visible selected to publish the page immediately, or choose Hidden to keep it as a draft. You can also set a future publish date.
- Click Save.
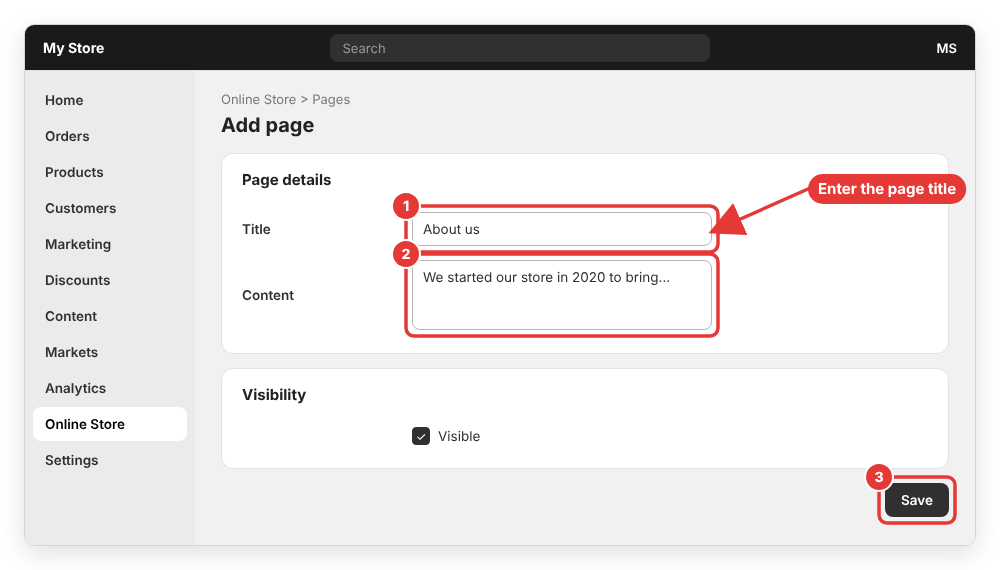
After saving, scroll down to the Search engine listing section and click the pencil icon to edit the Page title, Meta description and URL handle. Shopify may cut off titles longer than 70 characters and descriptions longer than 160 characters in search results. By default, your page will be available at https://your-store.com/pages/about-us.
Tip: if your store is still behind the password page, visitors cannot see your new pages yet. When you are ready, follow my guide on how to remove the password page and launch your Shopify store.
Step 2: Create a new page template in the theme editor
If the default layout is enough, you can skip to Step 4. Otherwise, let’s create a custom template for our About page.
- Go to Online Store > Themes and click Customize next to your current theme.
- At the top of the theme editor, click the page selector drop-down (it shows Home page by default).
- Select Pages, then click Create template.
- In the Create a template dialog, enter a unique Name, for example
about. - In the Based on drop-down, choose the existing template to copy, usually
Default page. - Click Create template.
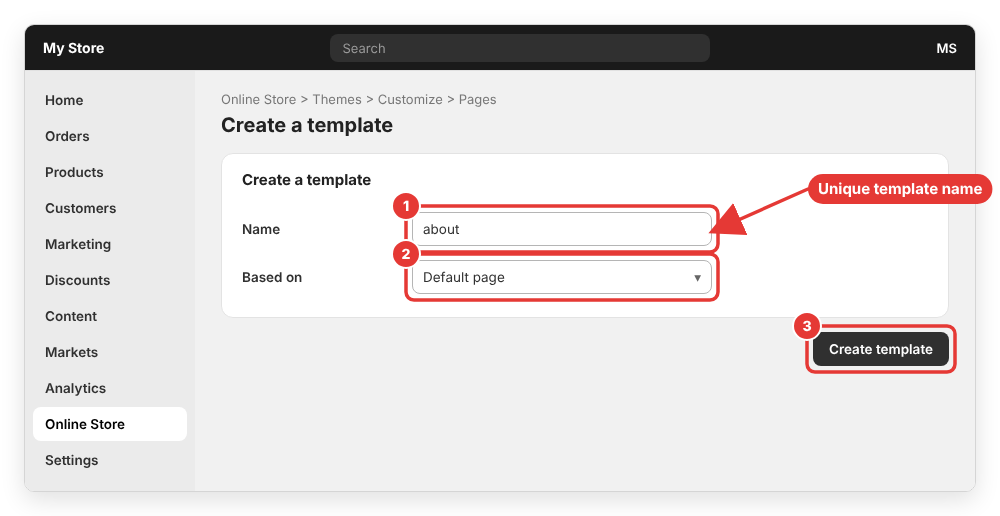
The editor now opens your new template. This is where the magic happens: click Add section and add the sections you need, such as Image with text, Multicolumn, Collapsible content (great for FAQ pages), Rich text or Featured collection. Keep the Page (main page content) section if you want the text from the admin to appear too. When you are happy with the layout, click Save.
Behind the scenes, Shopify saves the template as a JSON file in your theme, for example templates/page.about.json. You can see it later in the code editor:
templates/
  page.json          <- Default page
  page.contact.json  <- Contact page with form
  page.about.json    <- our new template
Note: creating templates in the theme editor requires an Online Store 2.0 theme. Older (vintage) themes need a new .liquid template file created in the code editor instead.
Step 3: How to assign a template to a page in Shopify
A new template does nothing until you assign it to a page:
- Go to Online Store > Pages and click the page you created, for example
About us. - Find the Online store section on the right side.
- Open the Theme template drop-down and choose your new template (
about). - Click Save.
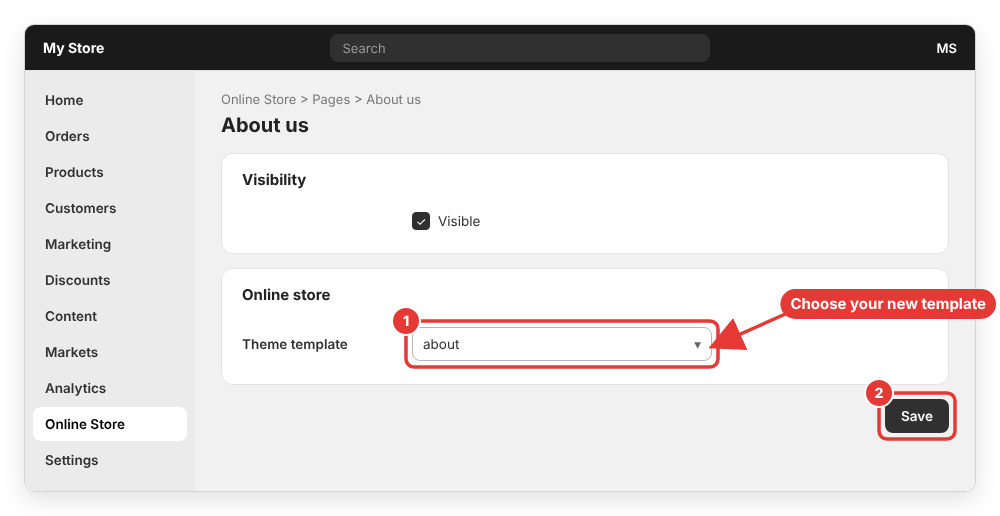
Open the page on your storefront and you will see the new layout. You can reuse the same template for as many pages as you like, which is handy for things like landing pages or several FAQ pages with the same design.
You can read more in the official Shopify Help Center article about creating and assigning theme templates.
A new page does not appear in your navigation automatically. To add it:
- Go to Content > Menus (in older admin versions: Online Store > Navigation).
- Click Main menu (header) or Footer menu.
- Click Add menu item, enter a label such as
About us, then click the Link field, choose Pages and select your page. - Click Save menu.
Want to group several pages under one heading like “Help”? Check out my guide on how to add a drop-down menu in Shopify.
Common errors
The Theme template drop-down is missing or does not show my template
Template assignments can only be made for the published theme, and the options come from the live theme. If you created the template in an unpublished copy of your theme, it will not appear in the drop-down until you publish that theme (or recreate the template in the live one). If there is no Theme template drop-down at all, your theme may be a vintage theme without alternate page templates.
There is no “Create template” button
This usually means you are using a vintage theme that does not support JSON templates. Either upgrade to an Online Store 2.0 theme or create a page.your-name.liquid file in the Templates folder of the code editor.
The page shows a 404 error
Check that the page visibility is set to Visible and that the publish date is not in the future. If you changed the URL handle, make sure the menu link points to the new URL. Shopify can create a URL redirect for you when you change the handle.
How do I rename or delete a page template?
The theme editor cannot rename or delete templates. Go to Online Store > Themes, click the … button next to your theme, choose Edit code, then rename or delete the file in the templates folder. Pages that used a deleted template fall back to the default page template.
The contact form is not showing
Assign the contact template to your Contact page in the Theme template drop-down. The form is part of that template, not of the page content.
Wrapping up
That’s how to add pages and page templates in Shopify: create the page in Online Store > Pages, design a custom template in the theme editor with Create template, assign it in the Theme template drop-down, and finally add the page to your menu. With a few custom templates you can build About, FAQ and landing pages that look just as good as your product pages, without any code.
What pages did you add to your Shopify store? If you get stuck with any of the steps above, leave a comment below and I will be happy to help.