You have built your Shopify store, added your products and picked a theme, but when you share the link with a friend, they only see a page that says “Opening soon” and asks for a password. That is the Shopify password page, and it stays there until you launch the store. Many new merchants search for how to remove the password in Shopify because the option is not where they expect it to be, or because Shopify keeps asking them to pick a plan first.
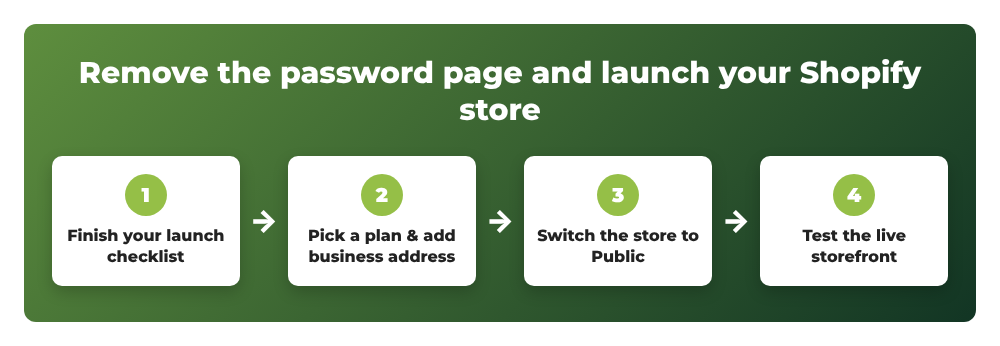
In this tutorial, we will learn how to remove the password page and launch your Shopify store step by step, using the current Shopify admin. We will also cover what to check before launch and how to fix the most common problems when the password page will not go away.
Previously, I published a tutorial on how to add products and variants in Shopify. If your catalog is ready, this guide is the next step.
Contents
- What is the Shopify password page?
- Step 1: Finish your launch checklist
- Step 2: Pick a plan and add your business address
- Step 3: Remove the password and launch your Shopify store
- Step 4: Test your live storefront
- How to customize the password page (if you want to keep it for now)
- Common errors when removing the password
- Wrapping up
What is the Shopify password page?
When you create a new Shopify store, the online store is private by default. Shopify calls this private mode: visitors see a password page instead of your storefront, and only people who know the storefront password can look inside. This gives you time to build the store without strangers seeing half-finished pages.
A few things are worth knowing before we start:
- The storefront password is not your admin login password. It is a separate password that you set in the Password field under Store access. Shopify recommends not reusing your admin password here.
- The status of your store is shown as Private or Public on the Online Store page in the admin.
- If your store is still on a free trial or does not have a business address yet, Shopify asks you to complete that step before it lets you remove the password.
You can read the official documentation in the Shopify Help Center article Restrict access to your online store.
Step 1: Finish your launch checklist
Once the password is removed, anyone can find your store and place an order. So before you go public, take ten minutes to go through this short checklist:
- Products: every product has a title, price, images and the correct inventory. Products should be set to Active and published to the Online Store sales channel.
- Shipping: you have shipping zones and rates for every country you sell to. If you have not done this yet, follow my guide on how to set up shipping rates in Shopify.
- Navigation: your main menu links to your collections and important pages. See how to add a drop-down menu in Shopify if your menu is still the default one.
- Payments: a payment provider is activated in Settings > Payments, so customers can actually pay at checkout.
- Policies and contact page: refund, privacy and shipping policies are filled in under Settings > Policies.
Tip: while the store is still private, you can share the storefront password with a friend and ask them to browse the store on their phone. Fresh eyes catch broken links and missing images very quickly.
Step 2: Pick a plan and add your business address
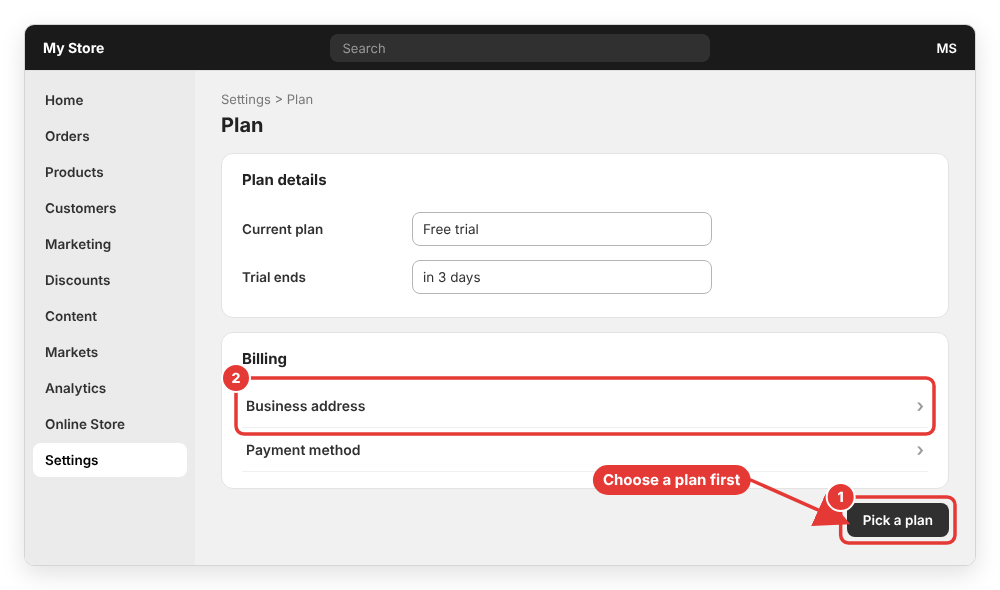
This is the step that confuses most people. During the free trial, you can build the store, but you cannot open it to the public. If you try to remove the password, Shopify shows a prompt asking you to pick a plan first.
To choose a plan:
- From your Shopify admin, go to Settings > Plan.
- Click Pick a plan.
- Click Choose plan under the plan you want, review the billing details and click Subscribe.
Shopify also needs a business address (used for billing and taxes). If it is missing, you will be asked to add it in Settings > General before you can launch.
Note: picking a plan during the trial does not always mean you pay immediately. Plan pricing and trial offers change often, so check the price shown on the Plan page before you confirm.
Step 3: Remove the password and launch your Shopify store
Now we are ready to remove the password. Shopify gives you two ways to do it. Both have exactly the same result, so use whichever you find easier.
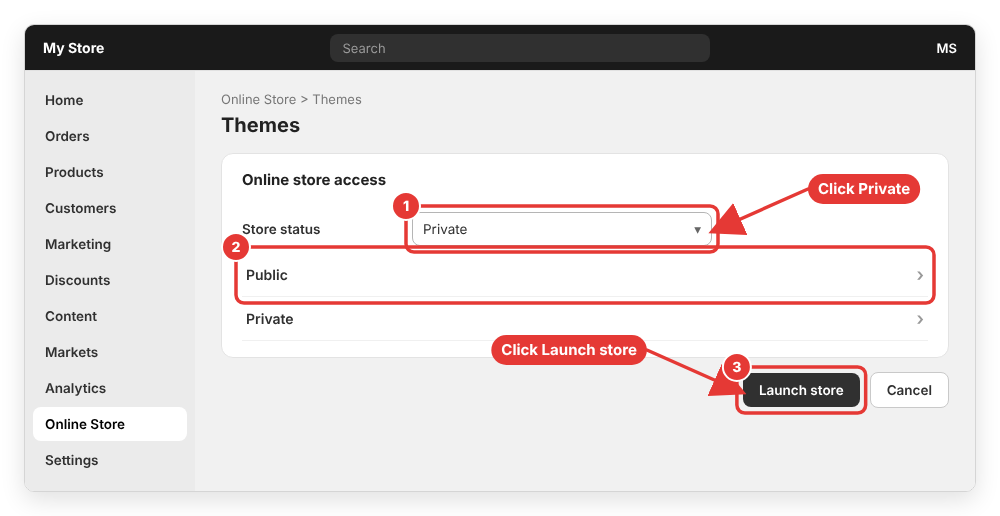
Option A: Use the access menu on the Online Store page
- From your Shopify admin, go to Online Store (the Themes page).
- Find the access menu that shows your store status. It will say Private. Click it.
- Select Public.
- Click Launch store. (The first time you make the store public, the button is called Launch store. Later, when you switch between private and public, it is called Update.)
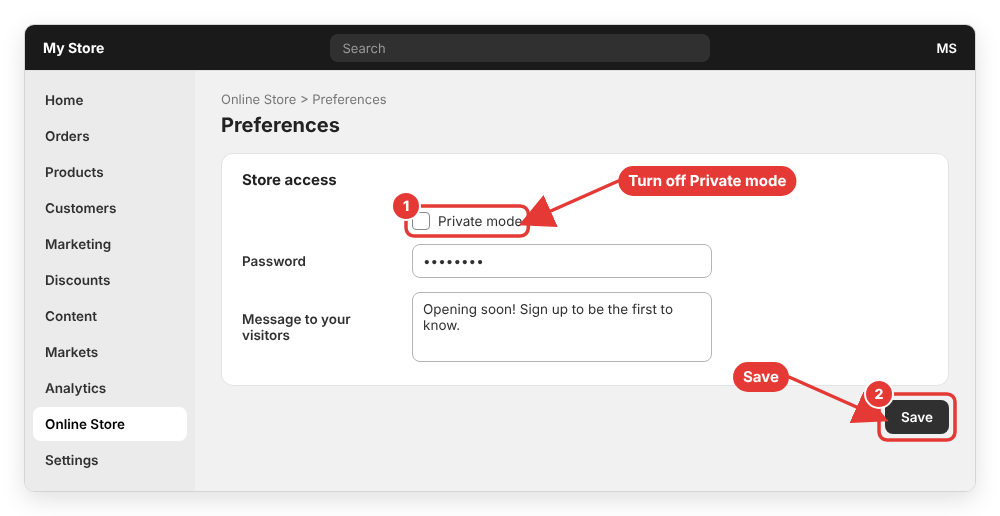
Option B: Turn off private mode in Preferences
- From your Shopify admin, go to Online Store > Preferences.
- Scroll down to the Store access section.
- Turn off the Private mode setting.
- Click Save.
That’s it! Your password page is gone and your store is now live for everyone.
Removing the password in the Shopify mobile app
If you manage your store from your phone, open the Shopify app, go to Online Store > Preferences and turn off the Password protection setting. The labels in the mobile app are slightly different from the desktop admin, but the result is the same.
Step 4: Test your live storefront
After launching, open your store in a private (incognito) browser window. This is important because your browser may still remember the password from earlier, so you might think the store is open while visitors still see the password page.
Check that:
- The home page loads without asking for a password.
- You can add a product to the cart and reach the checkout page.
- Your custom domain (if you have one) opens the store, not only the
your-store.myshopify.comaddress.
It is also a good idea to place one test order and then cancel it. If you need a refresher, here is how to cancel and refund an order in Shopify.
How to customize the password page (if you want to keep it for now)
Not ready to launch yet? You can make the password page look more professional instead of removing it:
- Change the message: go to Online Store > Preferences and edit the Message to your visitors field. Leave it blank if you don’t want a message.
- Change the design: go to Online Store, click Edit theme (or Customize), open the page selector at the top (it shows Home page) and choose Password. Most themes let you edit the header, content and footer sections and add an Email signup block, so you can collect emails from early visitors.
- Change the password: type a new value in the Password field under Store access and click Save.
Common errors when removing the password
“You need to pick a plan” / the button is disabled
Your store is still on the free trial. Go to Settings > Plan, click Pick a plan and subscribe to a plan. After that, return to Online Store and switch the store to Public.
Visitors still see the password page after launching
Usually this is caching. Open the store in an incognito window or a different device. If you use a custom domain, make sure it is connected and set as the primary domain in Settings > Domains. Some apps (for example “coming soon” or wholesale lock apps) add their own password screen, so temporarily disable those apps to see whether they are the cause.
The store is a development store or a store created by a Partner
Development stores created from a Shopify Partner account cannot be opened to the public until they are transferred to a merchant and a paid plan is selected. If you hired a developer, ask them to transfer ownership of the store to you first.
Private mode turns on again by itself
If your plan is paused, frozen or cancelled (for example, because a bill failed), Shopify locks the storefront again. Check Settings > Billing for unpaid bills and update your payment method.
Related: need to take a break later? Here is how to pause, close or delete a Shopify store.
Wrapping up
In this tutorial, we learned how to remove the password page and launch a Shopify store: finish the launch checklist, pick a plan and add your business address, switch the store from Private to Public (or turn off Private mode in Online Store > Preferences), and finally test the live storefront in an incognito window.
Did your store launch successfully, or did you get stuck on a step? Leave a comment below and let me know, I will try to help!