
Running an old Magento 2 version is risky. Every month you stay behind, you miss security fixes, PHP support and compatibility with new extensions. Sooner or later you need to upgrade Magento 2 to the latest version, and if you have never done it, the Composer commands can look confusing.
In this tutorial, we will learn how to upgrade Magento 2 to the latest version (Magento Open Source 2.4.8 or 2.4.9) from the command line with Composer. I will show you how to check your current version, prepare the server, run the upgrade commands in the right order and fix the most common errors after upgrading.
Previously, I published a tutorial on how to apply security patches in Magento 2. A security patch only moves you to a new -pN release of the same line (for example 2.4.8-p4 to 2.4.8-p5), while this guide covers a full upgrade such as 2.4.7 to 2.4.9. The commands are similar, but a full upgrade needs more preparation.
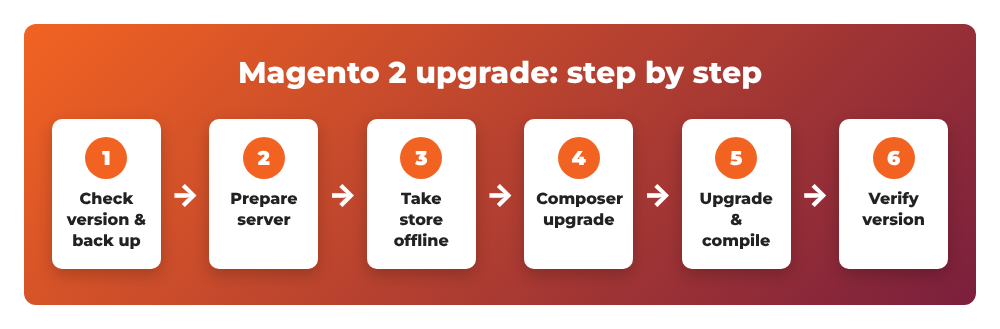
Contents
- Before you start: requirements for Magento 2.4.8 and 2.4.9
- Step 1: Check your current Magento version
- Step 2: Back up your store and test on staging
- Step 3: Prepare the server and install the Composer update plugin
- Step 4: Enable maintenance mode and stop cron
- Step 5: Upgrade Magento 2 to the latest version with Composer
- Step 6: Clear generated files and run setup:upgrade
- Step 7: Compile, deploy static content and reindex
- Step 8: Turn the store back on and verify the version
- Common errors
- Wrapping up
Before you start: requirements for Magento 2.4.8 and 2.4.9
Each Magento release supports specific versions of PHP, MySQL/MariaDB, OpenSearch and other services. Upgrade the server software before you upgrade Magento. Here are the main values from the official Adobe Commerce system requirements page (on-premises):
| Software | 2.4.8-p5 | 2.4.9 |
|---|---|---|
| PHP | 8.3, 8.4 | 8.5 |
| Composer | 2.10 | 2.10 |
| MySQL | 8.4 | 8.4 |
| MariaDB | 11.4, 11.8 | 12.3 |
| OpenSearch | 3 | 3 |
| RabbitMQ | 4.3 | 4.3 |
| Valkey | 8.1 | 9 |
| Varnish | 8 | 8 |
Always double-check the Adobe Commerce system requirements before you start, because the table is updated with every patch release. Two important notes:
- Magento 2.4.8 and later no longer support Elasticsearch, so switch your store to OpenSearch before the upgrade.
- Adobe recommends upgrading to MariaDB 12.3 before upgrading to 2.4.9 if you use MariaDB.
Step 1: Check your current Magento version
Log in to your server with SSH, go to the Magento root folder and run:
cd /var/www/magento2
php bin/magento --version
The output looks like Magento CLI 2.4.7-p3. If you want other ways to find it, see my guide on how to check the Magento 2 version.
To see which versions you can upgrade to, list the available releases:
composer show magento/product-community-edition 2.4.* --available | grep -m 1 versions
Pick the newest release you want. In this tutorial I will use 2.4.9; if your server can’t run its requirements yet, use the latest 2.4.8 patch instead.
Should you choose 2.4.8 or 2.4.9?
If your hosting already offers the newer PHP and database versions, go straight to 2.4.9 so you stay on a supported release line for longer. If you are on shared or managed hosting that can’t provide them yet, upgrading to the latest 2.4.8 patch is still a big step forward and keeps you on a release that receives security fixes. Whatever you choose, always pick the latest -pN patch of that line, because Adobe requires merchants to be on the latest patch or security patch to stay PCI-compliant.
Step 2: Back up your store and test on staging
Never upgrade a live store without a backup. At minimum, back up the database and the code (including composer.json, composer.lock, app/etc/env.php and pub/media):
mysqldump -u magento_user -p magento_db | gzip > ~/backup/magento_db_$(date +%F).sql.gz
tar -czf ~/backup/magento_code_$(date +%F).tar.gz --exclude=var --exclude=generated --exclude=pub/static .
Then run the whole upgrade on a staging copy first. Third-party extensions and custom themes are the most common reason an upgrade fails, so check that each vendor supports your target version before you touch production.
Step 3: Prepare the server and install the Composer update plugin
Update PHP, MySQL/MariaDB, OpenSearch and Composer to versions listed in the requirements table. Then check a few items from the official upgrade prerequisites:
- Cron jobs are running (
crontab -l). - The open files limit is high enough (
ulimit -n 65536). - File system permissions allow the Magento user to write to
var,generated,pub/staticandvendor.
Next, install the magento/composer-root-update-plugin. It provides the composer require-commerce command that updates both the Magento package and the root composer.json requirements for the new version:
composer require magento/composer-root-update-plugin ~2.0 --no-update
composer update
Step 4: Enable maintenance mode and stop cron
Put the store into maintenance mode so customers don’t place orders during the upgrade (read more about Magento 2 maintenance mode):
php bin/magento maintenance:enable
php bin/magento cron:remove
If you use message queues, let the consumers finish their work before you continue:
php bin/magento cron:run --group=consumers
ps aux | grep 'bin/magento queue'
Wait until the second command no longer shows running queue consumers.
Step 5: Upgrade Magento 2 to the latest version with Composer
This is the main part of the upgrade. First make a copy of composer.json, then require the new version with require-commerce (note: not plain composer require):
cp composer.json composer.json.bak
composer require-commerce magento/product-community-edition 2.4.9 --no-update
composer update
If you use Adobe Commerce instead of Open Source, replace product-community-edition with product-enterprise-edition. The composer update step downloads hundreds of packages, so it can take several minutes.
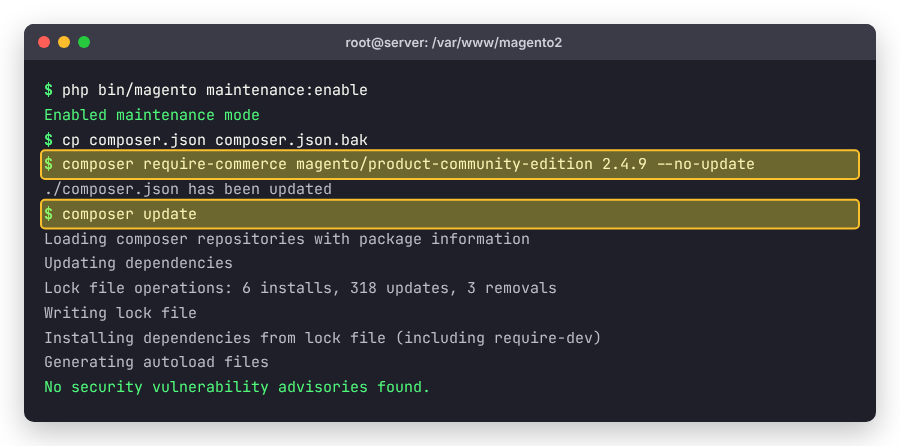
If Composer stops with a dependency conflict, read the message carefully. In most cases an extension in your composer.json requires an older version of a Magento module or PHP. Update that extension to a compatible version (or remove it temporarily) and run composer update again.
Step 6: Clear generated files and run setup:upgrade
Remove the old cache and generated code, then upgrade the database schema and data:
rm -rf var/cache/* var/page_cache/* generated/code/*
php bin/magento setup:upgrade
If you use Redis or Valkey for cache, flush it as well, because the rm command only clears file-based cache.
Step 7: Compile, deploy static content and reindex
If your store runs in production mode, compile the code and deploy static files again. Replace en_US with the locales your store uses:
php bin/magento setup:di:compile
php bin/magento setup:static-content:deploy -f en_US
php bin/magento indexer:reindex
php bin/magento cache:flush
In developer mode, you can skip compilation and static content deployment (only production mode needs these two commands).
Step 8: Turn the store back on and verify the version
Re-install the cron jobs, disable maintenance mode and check the version:
php bin/magento cron:install
php bin/magento maintenance:disable
php bin/magento --version
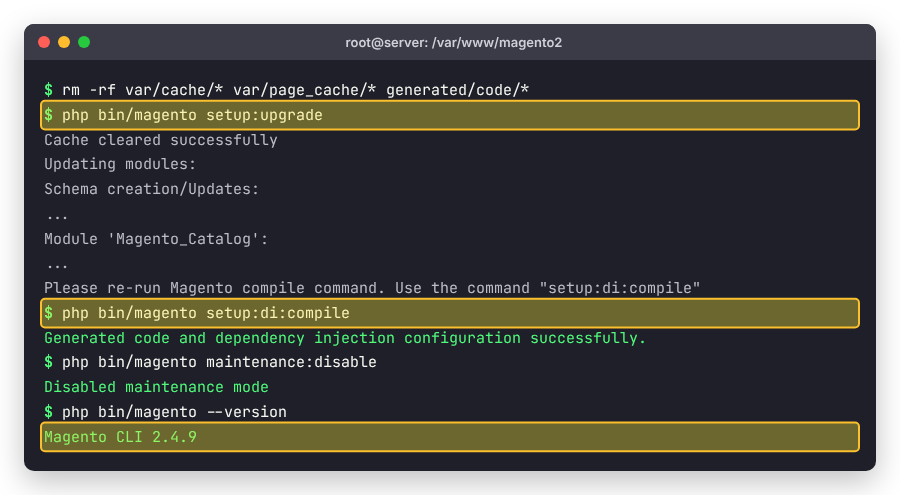
The output should show the new version, for example Magento CLI 2.4.9. If you use Varnish, restart it with service varnish restart. Finally, test the important flows: homepage, category and product pages, search, add to cart, checkout and the admin panel.
Common errors
- “Your requirements could not be resolved to an installable set of packages” – A package (usually a third-party extension) is not compatible with the new version or with your PHP version. Update or temporarily remove that extension, and confirm
php -vmatches the requirements. - “Please re-run Magento compile command” – You ran
setup:upgradein production mode but didn’t compile. Runsetup:di:compile. See how to fix the “Please re-run Magento compile command” error. - Search not working after the upgrade – Magento 2.4.8+ needs OpenSearch. Go to Stores > Configuration > Catalog > Catalog > Catalog Search, check the search engine connection and reindex.
- “One or more indexers are invalid” – Cron is not running yet. Run
bin/magento cron:installand reindex. - Blank pages or 500 errors – Check
var/log/exception.logand the web server error log. File permissions ongeneratedandpub/staticare a frequent cause after running commands as root.
If the upgrade fails and you can’t fix it quickly, restore composer.json.bak, your code backup and the database dump, then run composer install to go back to the previous version.
You can find the full official procedure in the Adobe guide to performing an upgrade.
Wrapping up
Now you know how to upgrade Magento 2 to the latest version: check your version, back up, update the server software, install the Composer root update plugin, run composer require-commerce and composer update, then setup:upgrade, compile and reindex. Always test on staging first and keep a backup ready, and the upgrade will be much less stressful.
Which version are you upgrading from, and did you hit any error along the way? Leave a comment below and let me know.