
Installing Magento 2 is never an easy task. Since the very first release, there are many problems users may encounter when installing Magento 2.
With the latest release of Magento 2.4, things have become harder as Magento 2 now, requires Elasticsearch as a mandatory component.
To make a Magento 2 installation work properly in the Production environment, users are recommended to install Magento 2 in localhost first. Then transfer the local installation to a Magento 2 hosting and update store’s Baseurl, and reindex Magento 2.
In this tutorial, we will go through the process of installing Magento 2 (with Elasticsearch) in Localhost using Xampp. The operation system in this tutorial is Windows 10 but this guide should work well for Windows 7 also
This installation guide works with Magento 2.4.0, Magento 2.4.1 and Magento 2.4.2
Refer to this article if you are looking for a guide to install Magento 2.4.x on ubuntu with Elasticsearch
Contents
Step 1: Install Xampp and Compose
In this step, we will install 2 components that are required to run Magento 2 on localhost environment XAMPP and COMPOSER (for windows)
XAMPP
First of all, we will download and install Xampp, a web server solution stack package that helps developers to create and test their applications on a local webserver.
>Download Xampp here: https://www.apachefriends.org/download.html
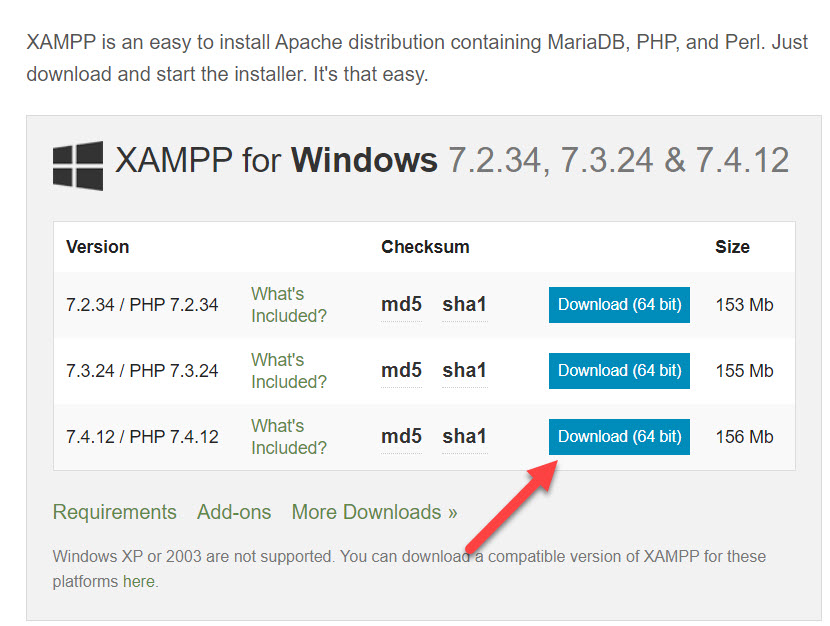
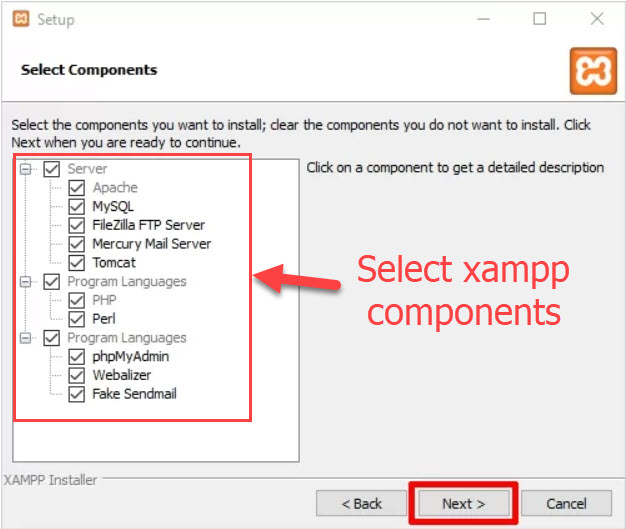
Next, run set up file and proceed with all steps to install Xampp. In Select Components step, make sure to select Mysql and PHP, PHPmyadmin.
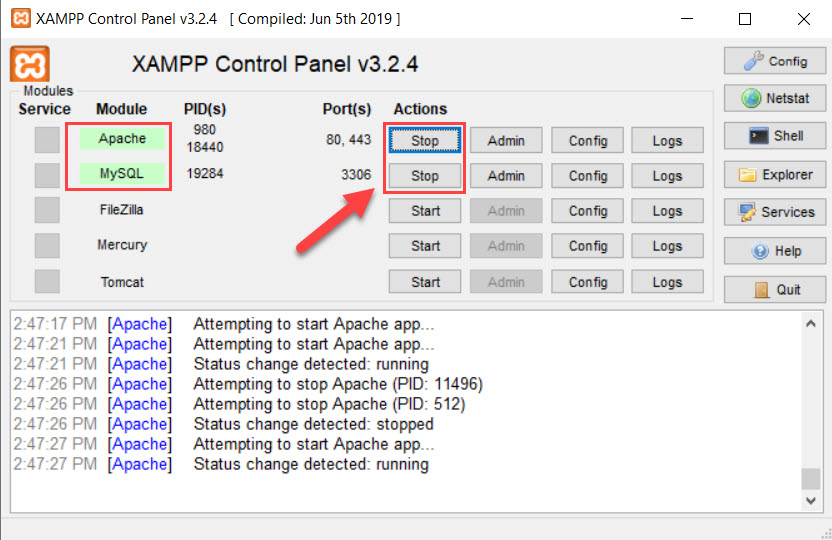
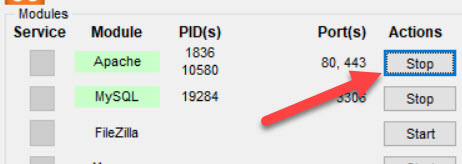
Now open XAMPP and start Apache and Mysql
COMPOSER
Now we will install Composer on localhost.
Composer is a library management tool in PHP (Dependency Management), this tool saves us a lot of time with the necessary packages that your project needs to use, you just need to declare it, Composer will automatically download the code of the libraries through a community server.
>Download Composer Windows version here: https://getcomposer.org/Composer-Setup.exe
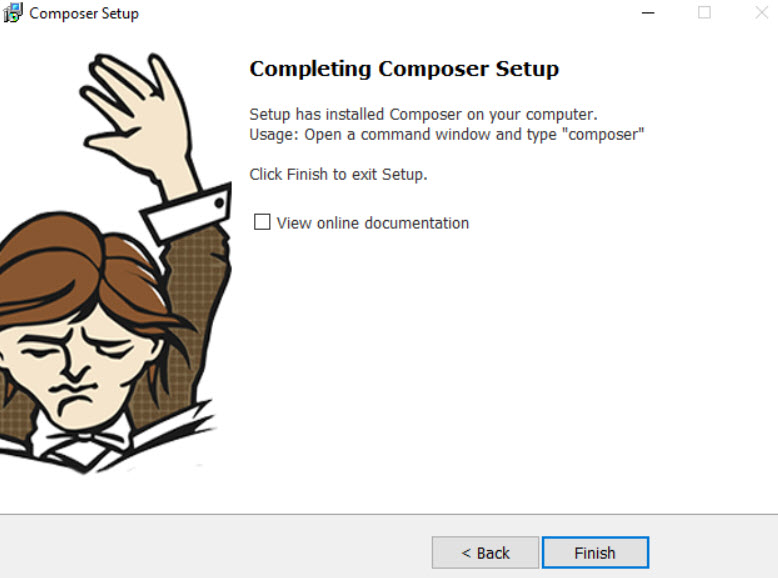
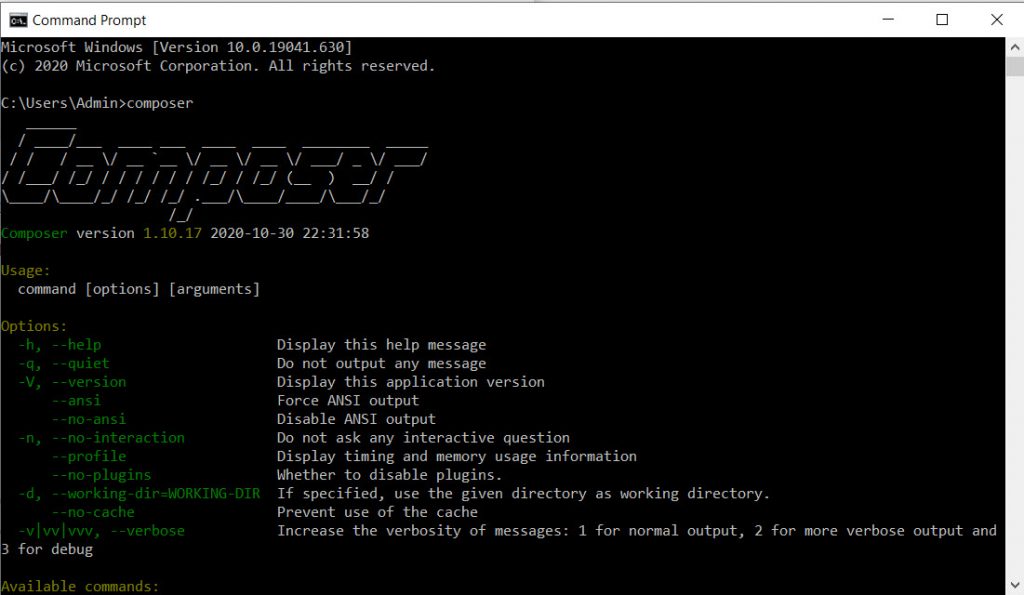
Now we will verify if Composer was successfully installed by opening Windows Command Promp and type composer . If the command prompt screen returns this outcome > Composer was installed properly
Important note: Magento 2.4 and Magento 2.4.1 installation does not support Composer version 2
- Magento 2.4.2 and later are compatible with both Composer 1.x and 2.x. You don’t need to downgrade composer version if you are installing Magento 2.4.2
- Magento 2.4.1 and earlier are compatible with Composer 1.x only.
If you install Magento 2.4 or 2.4.1 on Composer 2, you will probably see this error message
- Root composer.json requires magento/composer-root-update-plugin ~1.0 -> satisfiable by magento/composer-root-update-plugin[1.0.0].
- magento/composer-root-update-plugin 1.0.0 requires composer-plugin-api ^1.0 -> found composer-plugin-api[2.0.0] but it does not match the constraint.
By default, the version of composer for windows is the latest version 2.0.7. So to install Magento 2 properly on Windows we will need to downgrade Composer version to 1.10.17
Check current composer version by typing composer in command prompt interface, sample output:
  / ____/___  ____ ___  ____  ____  ________  _____
 / /   / __ \/ __ `__ \/ __ \/ __ \/ ___/ _ \/ ___/
/ /___/ /_/ / / / / / / /_/ / /_/ (__  )  __/ /
\____/\____/_/ /_/ /_/ .___/\____/____/\___/_/
                    /_/
Composer version 2.0.7 2020-11-13 17:31:06

Usage:
  command [options] [arguments]
=> That means the current composer version is 2.0.7. We will need to downgrade Composer to 1.10.17 to install Magento 2.4
To downgrade the composer version, issue this command:
composer selfupdate --1
Sample output:
root@magentip:~# composer selfupdate --1
Warning: You forced the install of 1.10.17 via --1, but 2.0.7 is the latest stable version. Updating to it via composer self-update --stable is recommended.
Upgrading to version 1.10.17 (1.x channel).

Use composer self-update --rollback to return to version 2.0.7
Step 2: Install elasticsearch on windows
Elasticsearch is now a required application to install Magento 2.4. During installation process, the system will verify if Eleasticsearch was installed and configured properly. If there’s something wrong with Elasticsearch verification, the installation process will stop.
Download Elasticsearch here: https://www.elastic.co/downloads/elasticsearch
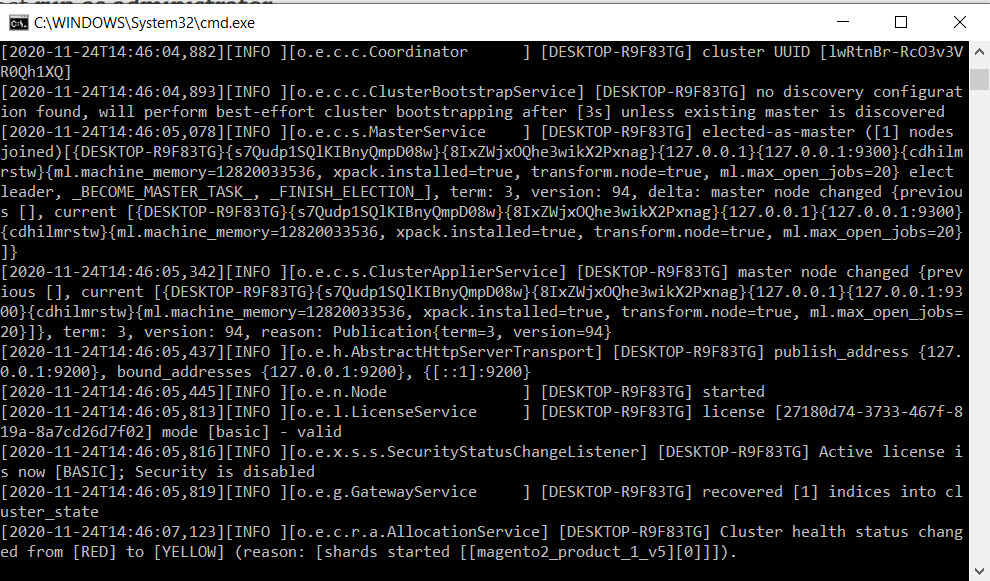
Next, unzip archived file and go to \elasticsearch\elasticsearch-7.10.0\bin
Right click on elasticsearch.bat and select run as administrator

Leave this window running on background
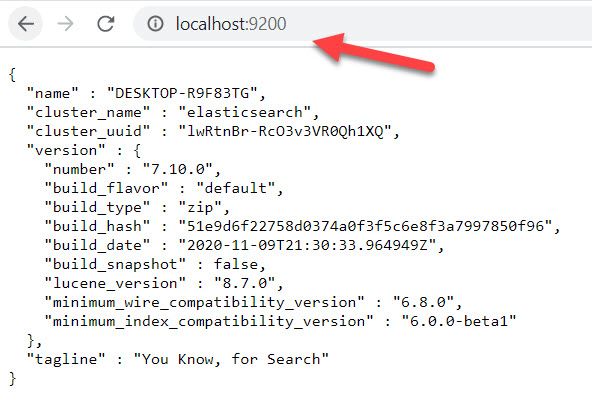
To check if Elasticsearch is running on your system, in your browser type: localhost:9200
If you see this result page => Elasticsearch is running properly
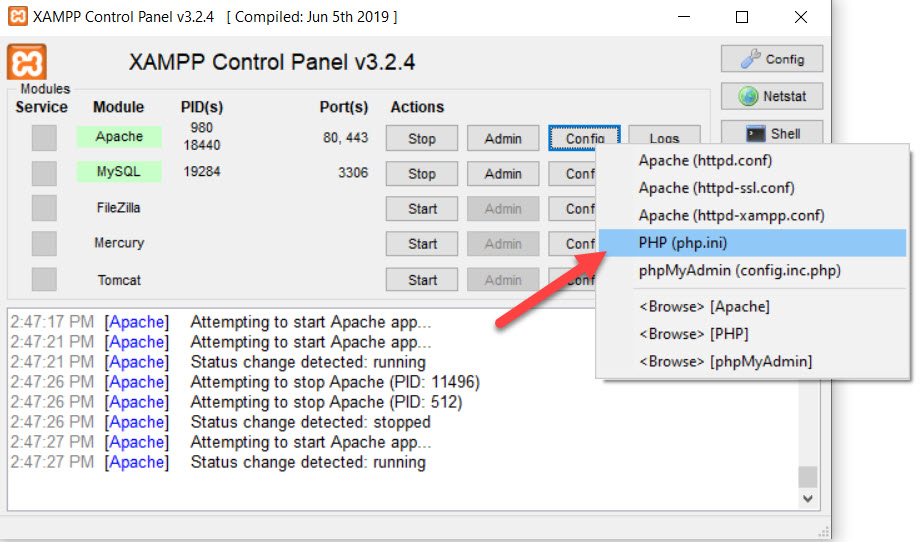
Step 3: Config php.ini
Before we will install Magento 2, make sure to install and enable all required PHP extensions and configure some PHP values to make the installation go smoothly
Enable required php extensions
As stated in Magento 2.4 system requirement, we need to install and enable the following php extension
| bcmath | ctype | curl | dom |
| gd | hash | iconv | intl |
| mbstring | openssl | pdo_mysql | simplexml |
| soap | xsl | zip | ext-sockets |
On windows OS, all the extensions are automatically and periodically compiled by the PHP Group. You just need to enable these required extensions in php.ini
Go to C:\xampp\php\php.ini and add these lines after the [PHP] tag to enable PHP extensions.
[PHP]
extension=php_intl.dll
extension=php_soap.dll
extension=php_xsl.dll
extension=php_sockets.dll
The other extensions are enabled by default after we install Xampp, so we don’t need to include them here. Remember to save files before exiting.
You will see such error if you don’t enable the required PHP extensions
Problem 1
  - php-amqplib/php-amqplib v2.10.1 requires ext-sockets * -> the requested PHP extension sockets is missing from your system.
  - php-amqplib/php-amqplib v2.10.1 requires ext-sockets * -> the requested PHP extension sockets is missing from your system.
  - Installation request for php-amqplib/php-amqplib v2.10.1 -> satisfiable by php-amqplib/php-amqplib[v2.10.1].
Problem 2
  - magento/framework 103.0.1 requires ext-intl * -> the requested PHP extension intl is missing from your system.
  - magento/framework 103.0.1 requires ext-intl * -> the requested PHP extension intl is missing from your system.
  - Installation request for magento/framework 103.0.1 -> satisfiable by magento/framework[103.0.1].
Sample error:

Configure php settings
In php.ini file, search and change the following values as below
max_execution_time=18000
max_input_time=1800
memory_limit=4G
These values will keep the installation go properly without interuption.
Finally, restart apache to apply php settings by click on apache Stop and Start button on XAMPP
Quick tip: You can quickly open php.ini on Xampp interface with this button
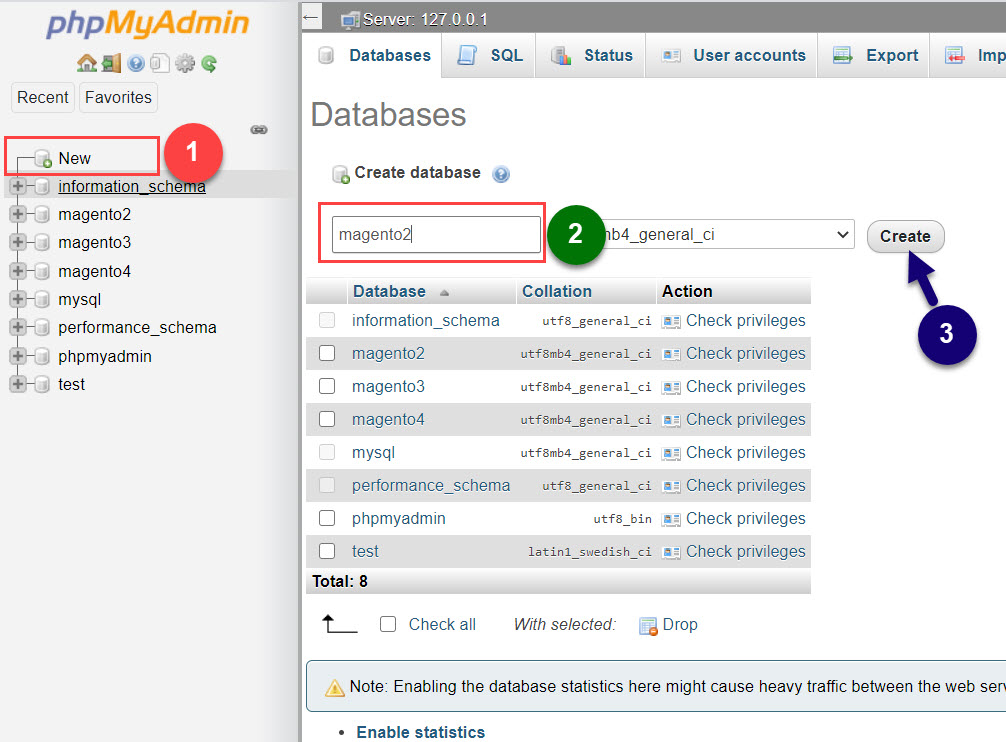
Step 3: Create database for Magento 2 website
Before we process the installation, we have to create a database for Magento 2 website to store all settings related to products, catalog, users, store configuration….
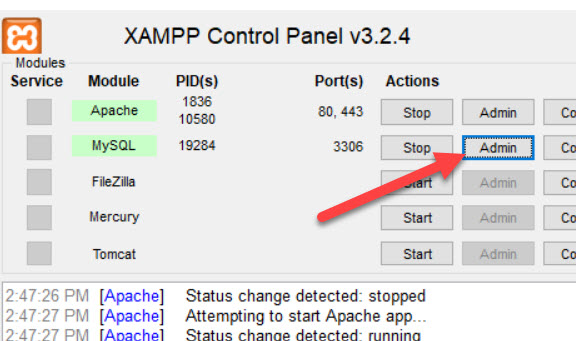
In Xampp interface, open PHPmyadmin by clicking on Admin button to open phpmyadmin (you can also type: localhost/phpmyadmin/ in browser to access phpmyadmin)
On phpmyadmin page, click on New => type database name => click on Create to create a new database. For example, I create magento2 database here
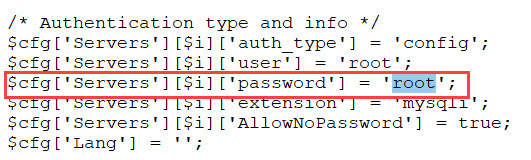
By default, Xampp does not set a password for MYSQL, so we will need to create a new root password for mysql.
On Xampp, click on Shell button to open command interface
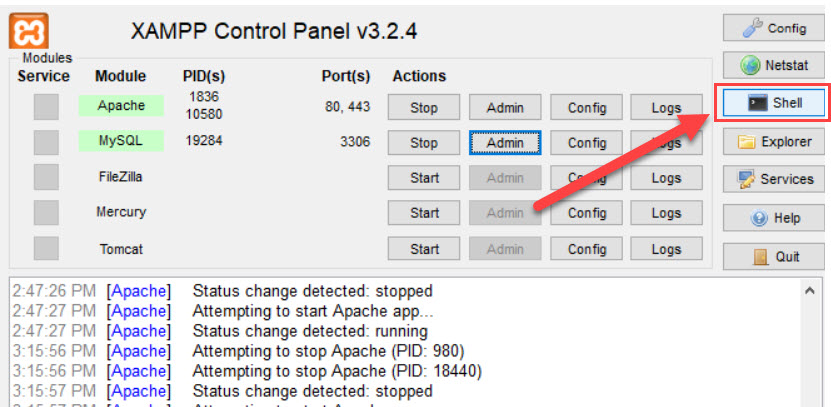
Next, input the following command to change mysql root password
mysqladmin.exe -u root password yourpassword
Peplace yourpassword with your desired password
Now, to use phpmyadmin, you will also need to enter the new password. To make phpmyadmin automatically login with your new password, go to C:\xampp\phpMyAdmin\config.inc.php and insert your new password here
Step 4: Install Magento 2
Now every preparation steps are done and we can start installing Magento 2 on Localhost.
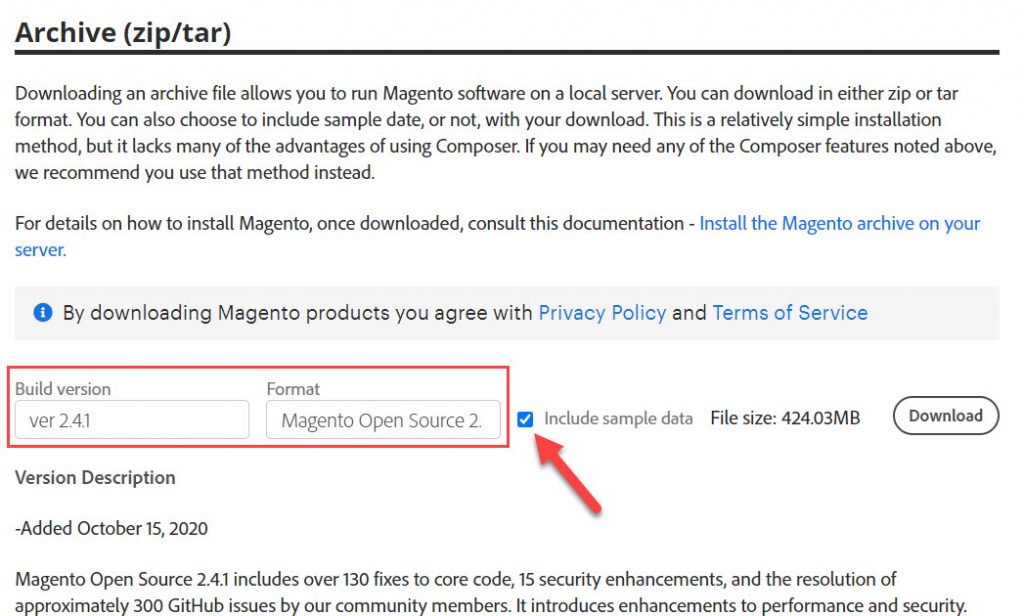
- First download Magento 2 with sample data here: https://magento.com/tech-resources/download .(you will be asked to log in with your account on Magento 2 website)
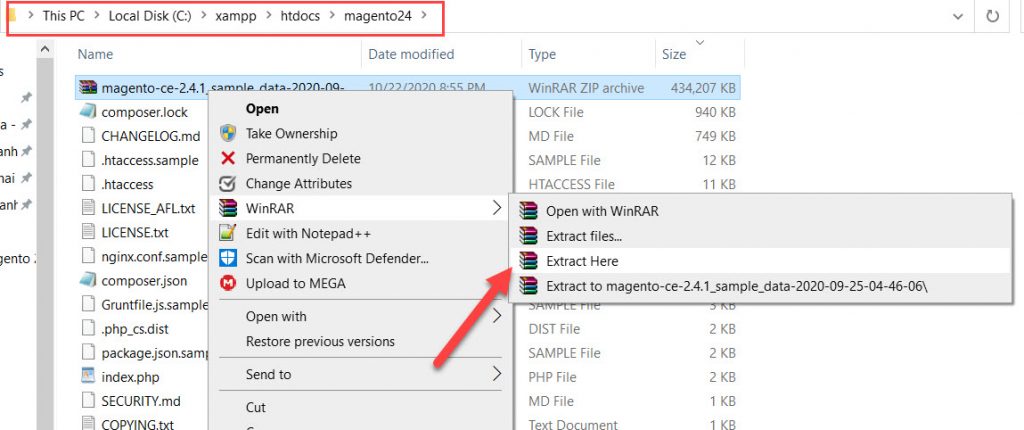
Next, unzip this archived file into a folder in xampp\htdocs folder. For example: C:\xampp\htdocs\magento24
Now, inside magento24 folder by holding shift key and click on Open Command Windows here
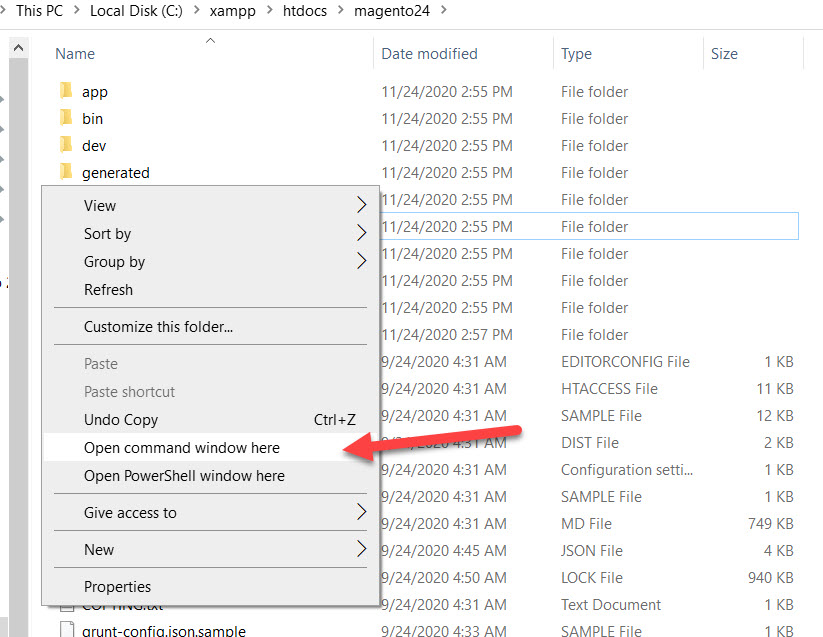
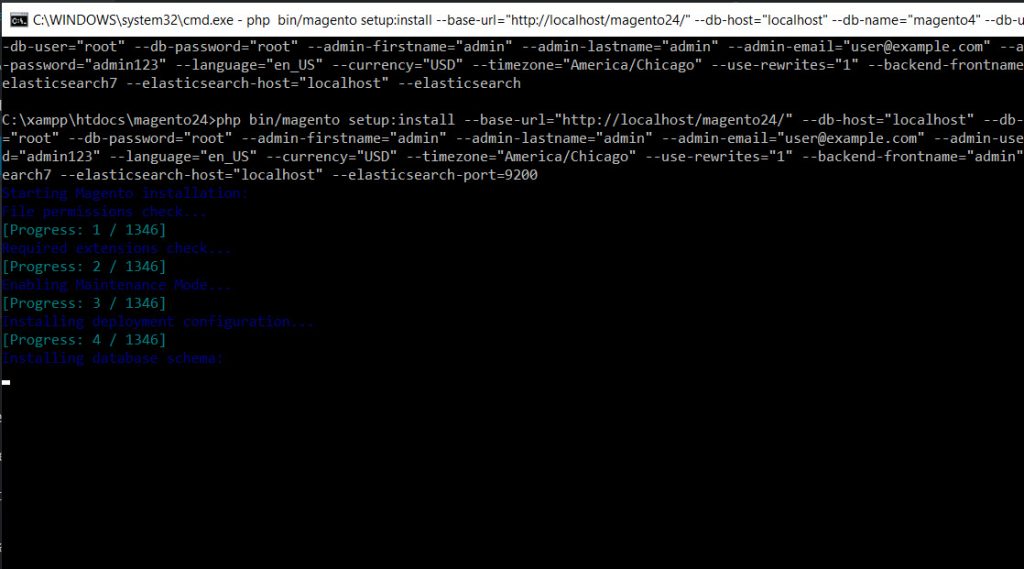
Now insert this command to start installing Magento 2 (make sure Elasticsearch, Apache, Mysql all are running before execute this command)
php bin/magento setup:install --base-url="http://localhost/magento24/" --db-host="localhost" --db-name="magento4" --db-user="root" --db-password="root" --admin-firstname="admin" --admin-lastname="admin" --admin-email="user@example.com" --admin-user="admin" --admin-password="admin123" --language="en_US" --currency="USD" --timezone="America/Chicago" --use-rewrites="1" --backend-frontname="admin" --search-engine=elasticsearch7 --elasticsearch-host="localhost" --elasticsearch-port=9200
Replace these values:
- –base-url: your magento 2 installation folder
- –db-name: your database name in step 3
- –db-password: your database password in step 3
Other values are optional, we can change later.
Now if everything is done properly, Composer will start to install Magento 2. The process will last for around 10 minutes, so take a break with your coffee and relax.
When everything is done, you will see this notification.
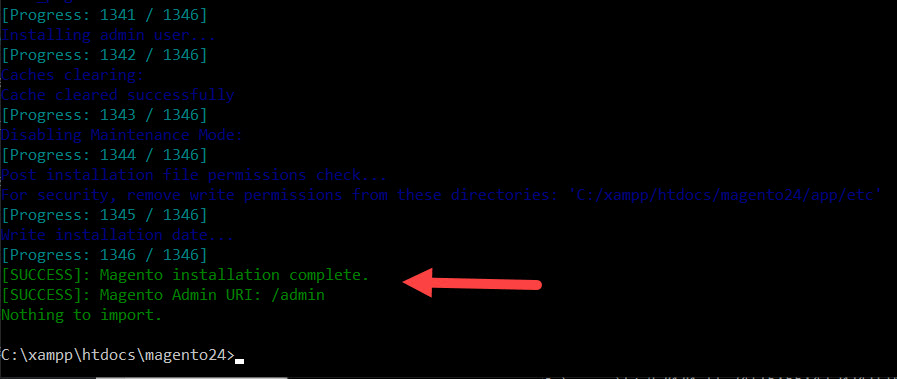
Congratulation, Magento 2.4 was successfully installed on localhost
Now if you go to your browser with this URL to access Magento 2 store: http://localhost/magento24 .You will probably see a blank page like this
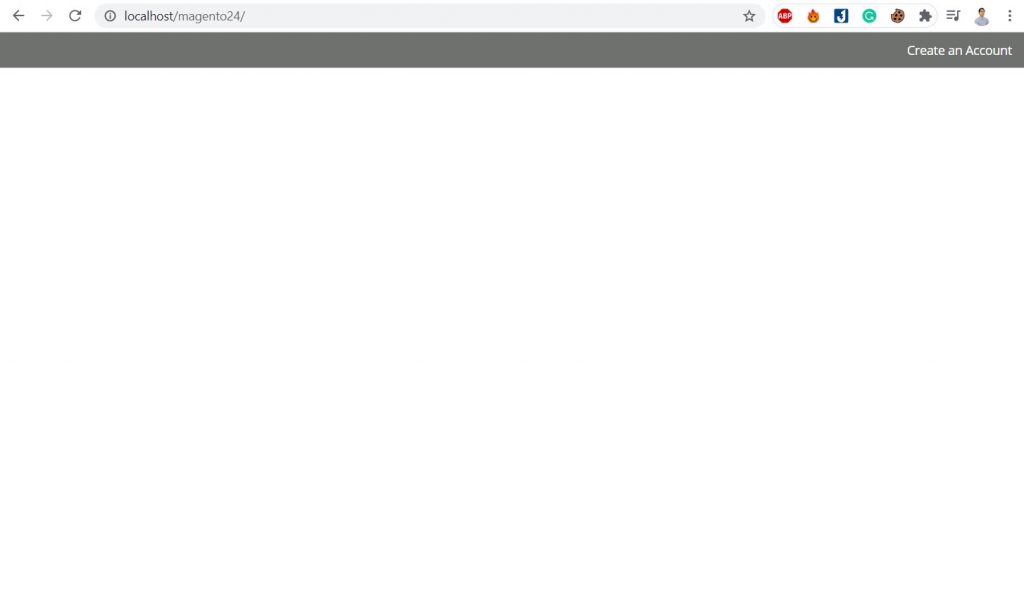
I mention the fix for this issue here: fix Magento 2 Blank Admin Page Issue . Here’s how to fix this:
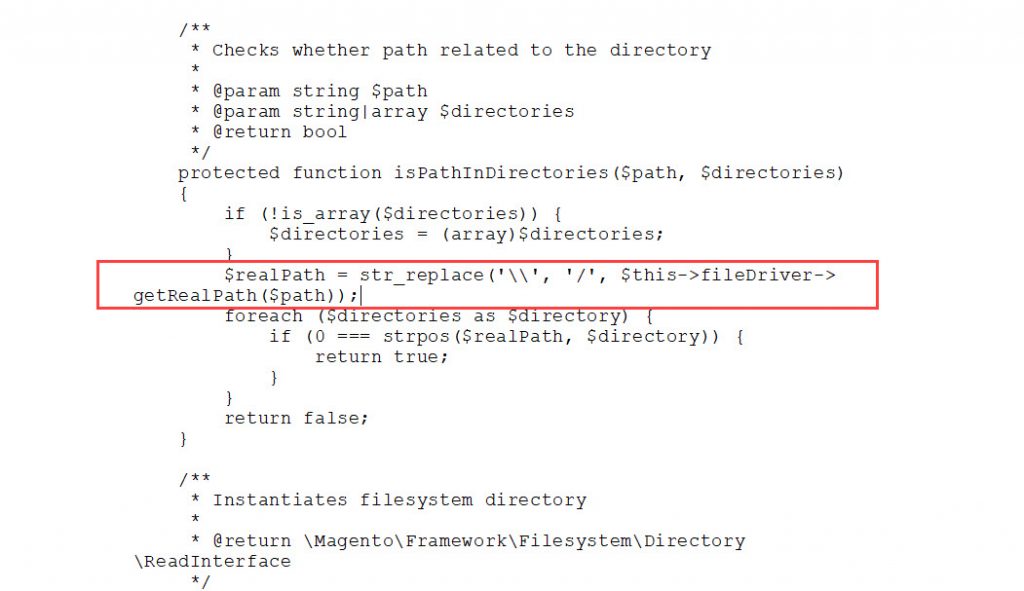
Go to: C:\xampp\htdocs\magento24\vendor\magento\framework\View\Element\Template\File
Edit Validator.php using a text editor and find this line:
$realPath = $this->fileDriver->getRealPath($path);
Replace with this code:
$realPath = str_replace('\\', '/', $this->fileDriver->getRealPath($path));
The new file should be like this after editting:
Next, you will need to run these command to upgrade the database and deploy static view files
php bin/magento indexer:reindex
php bin/magento setup:upgrade
php bin/magento setup:static-content:deploy -f
php bin/magento cache:flush
Wait for the process
C:\xampp\htdocs\magento24>php bin/magento setup:static-content:deploy -f

Deploy using quick strategy
frontend/Magento/blank/en_US            2476/2476           ============================ 100%   42 secs
adminhtml/Magento/backend/en_US         2549/2549           ============================ 100%   36 secs
frontend/Magento/luma/en_US             2493/2493           ============================ 100%   31 secs
Now reload your website and you will see the your new Magento 2 website on localhost
Step 5: Install sample data for Magento 2.4
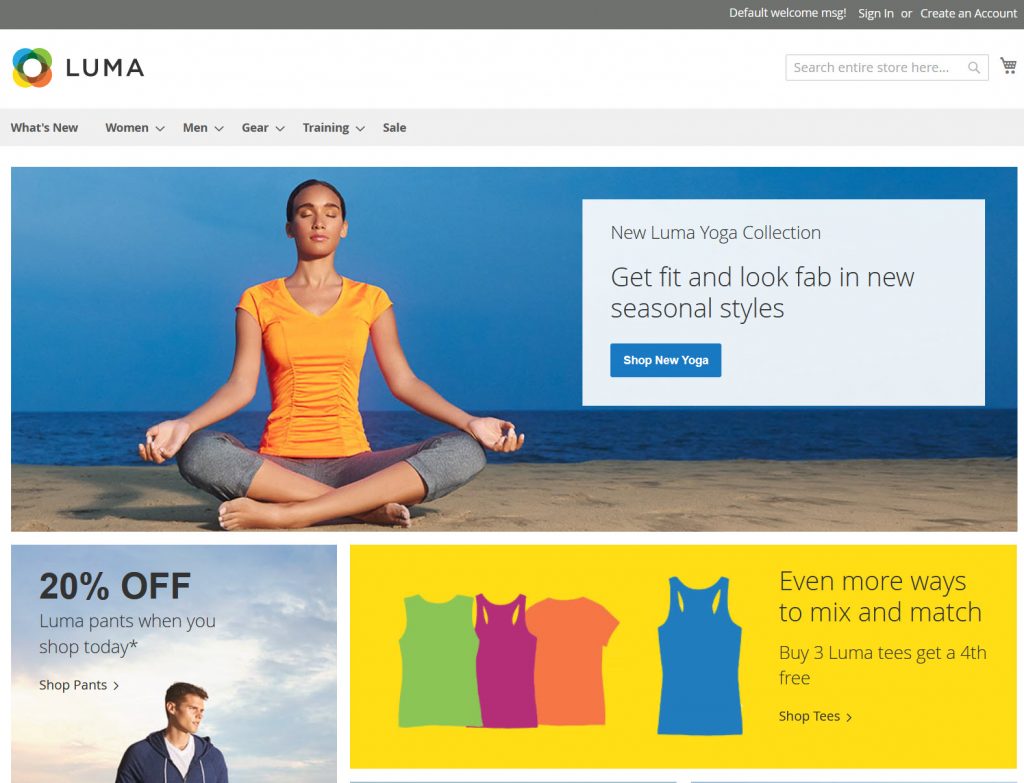
Now we will deploy sample data for our new Magento 2.4 website on localhost. Sample data will fill your website with some products, categories and images so your website will look like this:
In command interface, issue this command to deploy sample data
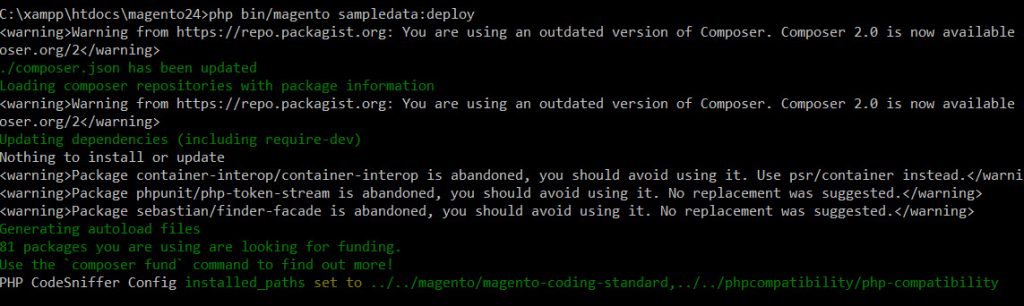
php bin/magento sampledata:deploy
sample output
Next, reindex, deploy static view files and upgrade database
php bin/magento indexer:reindex
php bin/magento setup:upgrade
php bin/magento setup:static-content:deploy -f
Finally flush cache to apply changes
php bin/magento cache:flush
Well done! refresh your website and enjoy your new Magento 2.4 installation with sample data

Troubleshoot admin login authentication error
When logging to admin dashboard, you may see this error
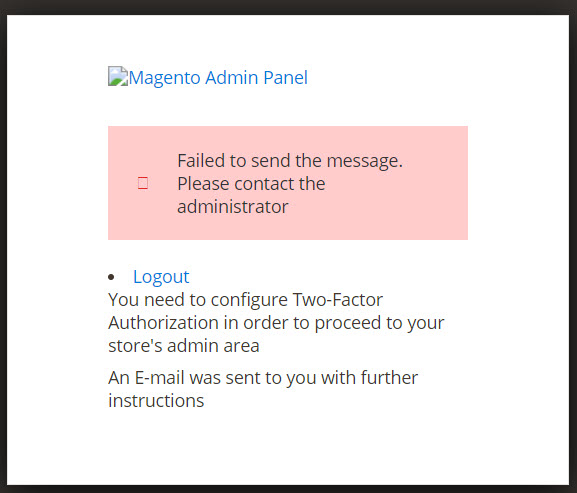
Full error message:
Failed to send the message. Please contact the administrator

You need to configure Two-Factor Authorization in order to proceed to your store's admin area An E-mail was sent to you with further instructions
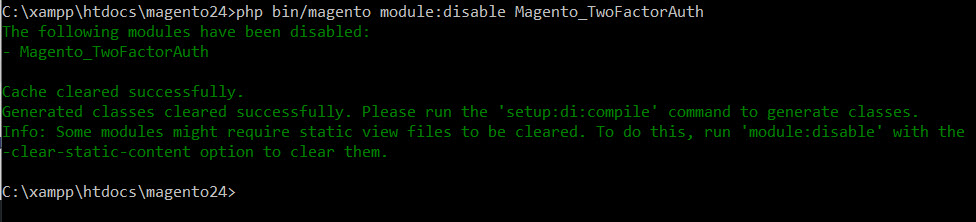
To fix this issue, open Magento 2 Command prompt and run this command
php bin/magento module:disable Magento_TwoFactorAuth
This command will disable Magento 2 Two-Factor Authorization so you won’t see the error message in admin panel
Now refresh admin page and you will be able to log in to admin dashboard normally.

If you see the notification message: one or more indexers are invalid. Make sure your magento cron job is running, please refer to this tutorial to reindex your Magento 2 store
Wrapping up
Installing Magento 2.4 on localhost is very frustrating and many users may give up because there’re too many issues during installation process. Just follow this tutorial step by step and drop a comment below if you need any help.
I believe you will have a proper Magento 2.4 installation on Localhost in just 30 minutes.
In the next tutorial, I will guide you on how to move Magento 2.4 from localhost to live production server, so stay updated with magentip.com to receive the latest tutorial on Magento 2.
")

")
96 Comments
Thank you very much for this step by step Magento installation. I congratulate him, he explains in detail what others do not do. Thank you again.
Gratz it works for you!
Deprecated: Method ReflectionParameter::getClass() is deprecated in F:\xampp\htdocs\mag\vendor\magento\framework\Code\Reader\ClassReader.php on line 34
After installing Magento 2.4.1 on a windows machine using XAMPP I’m getting two error messages
What is your PHP version?
Seems to be PHP version issue
Php version 7.3.2
Try using PHP version 7.4. In this tutorial, I’m using PHP 7.4 on XAMPP
I think that will solve your issue
If they don’t work for windows with magento 2.4 :
You need to perfact solution please edit below function on line no 96 follow this- vendor\magento\framework\Image\Adapter\Gd2.php–
private function validateURLScheme(string $filename) : bool
{
$allowed_schemes = [‘ftp’, ‘ftps’, ‘http’, ‘https’];
$url = parse_url($filename);
if ($url && isset($url[‘scheme’]) && !in_array($url[‘scheme’], $allowed_schemes) && !file_exists($filename)) {
return false;
}
return true;
}
Nice article!
solve the solution i am chacking next day
Deprecated Functionality: Method ReflectionParameter::getClass() is deprecated in C:\xamp\htdocs\magento2.4.2\vendor\magento\framework\Code\Reader\ClassReader.php on line 34
You should downgrade your php version to 7.4. because 8 is not supported
Good day, I got this at the very end of installation progress 1385/1390. Would please advise
In Compat.php line 1927:
This is not implemented, as it is not possible to implement Argon2i with ac
ceptable performance in pure-PHP
I am facing this issue at Magento installation progress 1385/1390 can someone please advise I have checked everywhere and no solution please help. the error is
in compat.php line 1927: this is not implemented, as it is not possible to implement argon2i with acceptable performance in pure-php
-2
I was installing Magento 2.4 on Xampp windows 10 and got the below error at progress 1385/1390.
in compat.php line 1927: this is not implemented, as it is not possible to implement argon2i with acceptable performance in pure-php
can someone advise please because I have tried everything. I have libsodium working already but the error is still coming Can someone please help thanks
i have 500 internal server error in homepage, magento version 2.4.2 php 7.4
You can check your .htaccess file. Try to rename/remove .htaccess file.
Also, check if file permission is set properly, refer here: https://devdocs.magento.com/guides/v2.4/install-gde/prereq/file-system-perms.html
Thanks for the amazing article .
I have followed exactly the same steps . but am facing issue like ” The –search-engine options does not exists ” . But I
confirm the elastic search is running on port 9200 . Any help here
Did you install and run Elasticsearch? Please capture a screenshot of that error
Thank you so much.
PHP Fatal error: Namespace declaration statement has to be the very first statement or after any declare call in the script in C:\xampp\htdocs\magento\vendor\magento\framework\Image\Adapter\Gd2.php on line 9.
this is the issue i am facing
I’m not the same person but I have the same error. Attached is a screenshot: https://ibb.co/jkWYgFs (I’ve hidden private information)
Hello,
Thank you for the detailed tutorial, it has been really beneficial.
I am facing issues accessing the website on localhost/magento24, it only works on localhost/magento24/pub
Plus I can’t access the admin URL, it shows Not Found, any solutions?
Купуйте ефективні дженерики преміум-якості з блискавичною доставкою!
100% дієві афродизіаки для підсилення потенції, підвищення лібідо та поліпшення самопочуття — для нього і для неї.
Швидка доставка по Україні, СНД та Європі. Оптові та роздрібні замовлення.
Перевірені відгуки, зрозумілі інструкції, надійні рішення — усе для вашої впевненості.
Перейти на сайт трип скан официальный
посетить сайт трип скан вход
на этом сайте трип скан официальный сайт
нажмите vodkabet новый сайт
деформационная обработка – гибка на прессе с возможностью получения деталей с любым типом линейного сгиба, вальцовка для получения цилиндрических, конических изделий;
конкурентоспособные цены на продукцию и услуги благодаря собственному производству и отсутствию посредников;
Каждый этап — от приёма заявки до выдачи груза — отлажен и автоматизирован, что позволяет выполнять даже крупные и нестандартные заказы в оперативные сроки https://arma-stal.ru/catalog/filtry-i-klapana/klapany-obratnye/klapan-obratnyy-muftovyy/?sort=propertysort_CARVING_MM&order=ASC&page=100&set_filter=y
Труба нержавеющая особотонкостенная – удобная и практичная
Почему выбирают нашу нержавейку?
Hi bro.
I have found an amazing blockchain engineering. Check it out!
Blockchain Architecture
Good luck!
Источник kraken ссылка на сайт
выберите ресурсы kraken ссылка тор
Реестр EAG — система анализа данных о компаниях и финансовых сервисах.
Сервис помогает получить дополнительную информацию о финансовой платформе перед сотрудничеством.
Основные направления:
• информационная проверка организаций;
• проверка финансовых посредников;
• информация о криптосервисах;
• проверка признаков недобросовестной деятельности;
• сведения о недобросовестных платформах;
• раздел о возможностях возврата платежей.
EAG Реестр является официальным дочерним сервисом Eurasian Group.
Сервис может помочь при первичной проверке компании.
В системе представлены данные для проверки финансовых платформ.
Проверка финансовых платформ:
eurasia-reestr.com
Информационный мониторинг помогает внимательнее относиться к выбору финансовых сервисов.
EAG Реестр — информационный сервис для анализа финансовых организаций.
Официальный сайт:
eurasia-reestr.com
молодые девушки балашиха
Подробнее https://t.me/s/mounjaro_tirzepatide/
сюда tripscan официальный сайт
смотреть здесь casino retro registration
find out this here
opencart cryptocurrency
перенаправляется сюда https://slon4-at.com
Главная https://slon8-cc.at
Продолжение casino retro
8o9uej
2m1vya
авральный восстановление работоспособности агрегатов для стирки и рефрижераторного оборудования на территории областном центре химиков ! техник в офис недвижимость в течение астрономический час . выявление неисправности безвозмездно, гарантия 6-месячный срок . наберите номер и бронируйте выезд на веб-странице: немедленный ремонт агрегатов для стирки
12 лет опыта с автономо https://vedenie-autonomo.top/
длительный секс
online casino uk
casino sites best online casino real money best online casino
casino sites online
лояльность Балашиха
Продолжение https://trip71.us
https://ufa-indi.top/ безопасность и комфорт
бестия Стерлитамак
Декоративный щебень широко применяется в ландшафтном дизайне и при благоустройстве придомовой территории https://kupit-peska-shebna.ru/pochva-i-grunt
Классификация гранитного щебня по фракциям
Влияет на качество уплотнения и прочность основания
5-10, 5-20, 20-40, 40-70, 70-120 мм
Применение декоративного щебня
Технические характеристики гранитного щебня
bwlec0
sex-kaluga.top страпон Калуга
сюда retro casino
найти это https://tripscans90.cc
https://www.tat-london.co.uk/members-area/kgjvutfhcjvyyjv64240032/profile
посетить сайт сайт трипскан
такой tripscan
выберите ресурсы tripscan зеркало
ramey6
Главное отличие, о котором стоит знать
Советские игровые приставки
Интернет
Устройство консоли
Основная статья: Пятое поколение игровых систем
этот сайт tripscan вход
стабильные сроки изготовления при любом объёме;
navigate to these guys ddos me
этот контент зарубежные подписки из россии
узнать SEO оптимизация telegram бота
Jemand ankommen im_Anschluss_an gewissen gedehnten Tageszeit spater_als Wohnort ferner personliche Extremitaten stehen kraftlos zudem spuren selbst wie mittels Bleimetall gefullt daran
Mithilfe_von Pflegemittel klingt_ab dieser Leidenszustand
Verteilen Sie vorliegende Creme mit leichten Ablaufen seitens abwarts nach hoch obenauf au?erdem bereits_nach gema? bestimmten Augenblick wahrnehmen Euch eine angenehme Kaltgefuhl sowie gewisse enorme Linderung
Zuruckholen Ihnen selbst diese Vergnugen hinsichtlich genannten Aktivitat frei_von Beschwerden zudem Beschwerden wieder
eigene Gliedma?en mogen es dir wertschatzen
Hier klicken zum Kaufen
calfae
Сантехніка
этот контент водка бет
Люди подскажите То сайты виснут Кадастровые номера и границы Короче, нашел отличный инструмент — росреестр публичная кадастровая карта без глюков Увидел границы и соседей В общем, смотрите сами по ссылке — пкк кадастровая карта https://publichnaya-kadastrovaya-karta-abc.ru Не мучайтесь с росреестром Перешлите тому кто ищет участок
можно проверить ЗДЕСЬ vodka bet casino
здесь водкабет казино
индивидуалки Черниковка на любой вкус
Количество стеклопакетов
Бизнес
узнать больше Здесь vodkabet
What’s up, DeFi crowd?
Just stumbled on a comprehensive piece about AI in trading.
It compares top coins in blockchain scene.
Definitely a good weekend read.
See full post
VIP путаны Калуга
devushki.org Калуга девушки
продолжить vodka bet
посмотреть на этом сайте водкабет
Hello everyone.
I found a custom MiCA compliance software software partner for blockchain companies.
Could help with MiCA KYC software.
CASP compliance software
Have fun!
For anyone who knows the feeling of wanting a better haircut but not knowing how to describe it, this platform offers a more precise path. Using a selfie and a short quiz, it analyzes face shape, hair type, and context to generate 10 haircut options with photorealistic visuals and a guide for the barber. Behind the result is not a simple filter, but a mathematical model with 50+ parameters and an anatomical 3D scan, designed to show how a cut fits. In other words, this is not a sticker-style app, but a system built on over 50 criteria, including 3D facial mapping, so you see a style grounded in measurable fit. Rather than generic “wig” overlays, the report presents realistic visuals that reflect actual shape and proportion. Additionally, the package includes a barber-friendly instruction set, so the recommendation is not only attractive on screen but also usable in the chair. In just a few steps, you can move from a single photo to 10 matched options and a PDF report, with no sign-up friction. For people who have long worn a cut that does not really suit them, or for anyone who prefers a practical, data-backed style decision, this approach offers both clarity and confidence. https://hairstyleai.space/
Следующая страница https://slon8-cc.at/
нажмите здесь https://slonz9.cc
Scalp, swing or hold positions with spreads from 0.0 pips — your strategy deserves better conditions. Trade Smarter with Vantage No dealing desk, no games.
проститутки стерлитамак выезд
Help heavy feet feel lighter with every massage. Give overworked feet the comfort they need. Tap the link to find out more => psce.pw/96q5mn
Продолжение https://slon9-cc.com/
Следующая страница https://slon9-cc.net/
Hi everyone.
I was checking a MiCA software development software partner for Web3 startups.
Looks useful for CASP compliance requirements.
EU crypto compliance software
Thanks!
эскорт сервис 7 Роз
view it trezor suite
здесь https bs2best at
Узнать больше b blsp at
escort chicas en valencia
It only works when I’m Malaysia.