
The fonts you choose say a lot about your brand. A luxury jewelry store and a skateboard shop should not look the same, yet many new Shopify stores keep the default theme font forever simply because the owner does not know where the setting is. In this tutorial, we will learn how to change fonts in Shopify: how to pick new heading and body fonts in the theme editor, how to change the font size, and how to add your own custom font when the built-in library is not enough.
Previously, I published a tutorial on how to remove the password page and launch your Shopify store. Typography is one of the last things worth polishing before you open the doors, so this guide is a good next step.
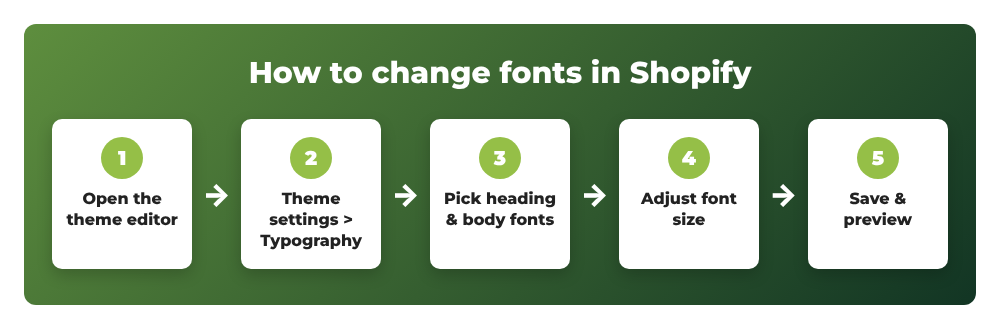
Here is an overview of the whole process:
Contents
- Before you start: where Shopify fonts are controlled
- Step 1: Open the theme editor
- Step 2: Go to Theme settings > Typography
- Step 3: Change the heading and body font in Shopify
- Step 4: Change the font size
- Step 5: Save and preview your store
- Step 6: Add a custom font to Shopify (optional)
- Common errors when changing fonts in Shopify
- Wrapping up
Before you start: where Shopify fonts are controlled
In Shopify, fonts are not a store-wide admin setting. They belong to your theme. Every Online Store 2.0 theme (Dawn, Horizon, Refresh, Sense and most paid themes) exposes a Typography group inside Theme settings in the theme editor. That means:
- If you switch to another theme, you have to set your fonts again in that theme.
- The exact setting names depend on the theme. Dawn uses
HeadingsandBody, while newer themes like Horizon split typography into more roles (body, subheading, heading, accent) and type presets. The steps below are the same idea in every theme. - The checkout uses its own branding settings, so changing the theme font does not change the checkout font.
Tip: before making design changes on a live store, duplicate your theme from Online Store > Themes > … > Duplicate so you always have a backup to roll back to.
Step 1: Open the theme editor
From your Shopify admin, go to Online Store > Themes. Next to your current theme, click Customize. The theme editor opens with a live preview of your home page.
Step 2: Go to Theme settings > Typography
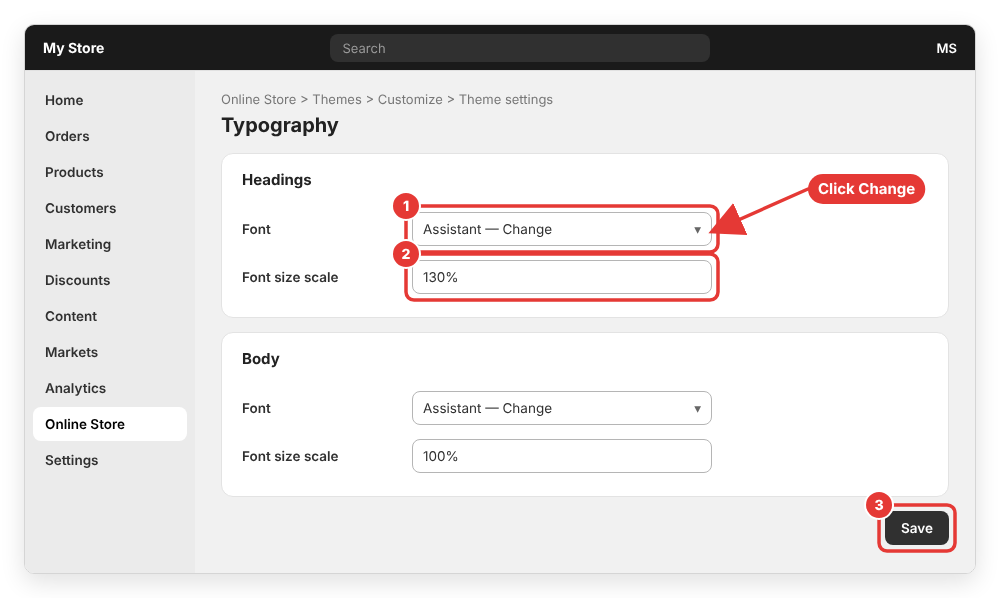
In the left sidebar of the theme editor, click the Theme settings icon (the paintbrush/gear icon, depending on your editor version). A list of setting groups appears: Logo, Colors, Typography, Layout, Buttons and so on. Click Typography.
In Dawn you will see two blocks:
- Headings – used for page titles, section headings and product titles.
- Body – used for paragraphs, menus, buttons, prices and most other text.
Step 3: Change the heading and body font in Shopify
Under Headings, click Change next to the current font name. The Shopify font picker opens. Here you can:
- Type a font name in the search box (for example
Montserrat,Playfair DisplayorWork Sans). - Click a font to preview it instantly on the right side of the editor.
- Click Select to apply it.
Repeat the same steps for the Body font. All fonts in the picker come from the Shopify font library, which contains system fonts plus a large collection of licensed web fonts that you can use for free on your storefront. Shopify hosts them on its CDN, so you do not need to upload anything.
A few typography tips that work well for most stores:
- Use at most two font families: one for headings and one for body text.
- Pair a display or serif heading with a clean sans-serif body font (for example
Playfair Display+Assistant). - Keep the body font highly readable. Fancy script fonts belong in headings only.
- System fonts (such as
Helveticaor the “System” options) load the fastest because the visitor’s device already has them.
Step 4: Change the font size
Most free themes include a Font size scale slider under each typography block. In Dawn, the heading scale goes from 100% to 150% and the body scale from 100% to 130%. Drag the slider and watch the preview update in real time.
Newer themes such as Horizon use type presets instead, where you set the size, line height and letter spacing for each level (paragraph, H1, H2 and so on). If your theme does not offer a size option for a specific element, you can still override it with custom CSS, which we will cover in Step 6.
Always check the result on mobile. Use the device switcher at the top of the theme editor to preview the store on a phone screen, because a heading that looks great on desktop may wrap into four lines on mobile.
Step 5: Save and preview your store
Click Save in the top-right corner of the theme editor. The new fonts are live immediately on the published theme. Open your storefront in a private browser window and check the home page, a product page, the cart and a blog post to make sure everything looks consistent.
If you also want to restyle the navigation after changing fonts, check out my guide on how to add a drop-down menu in Shopify.
Step 6: Add a custom font to Shopify (optional)
Sometimes your brand uses a font that is not in the Shopify font library. In that case you can upload the font files yourself and load them with CSS. Make sure you have a web license for the font before you upload it to your store.
6.1 Upload the font files
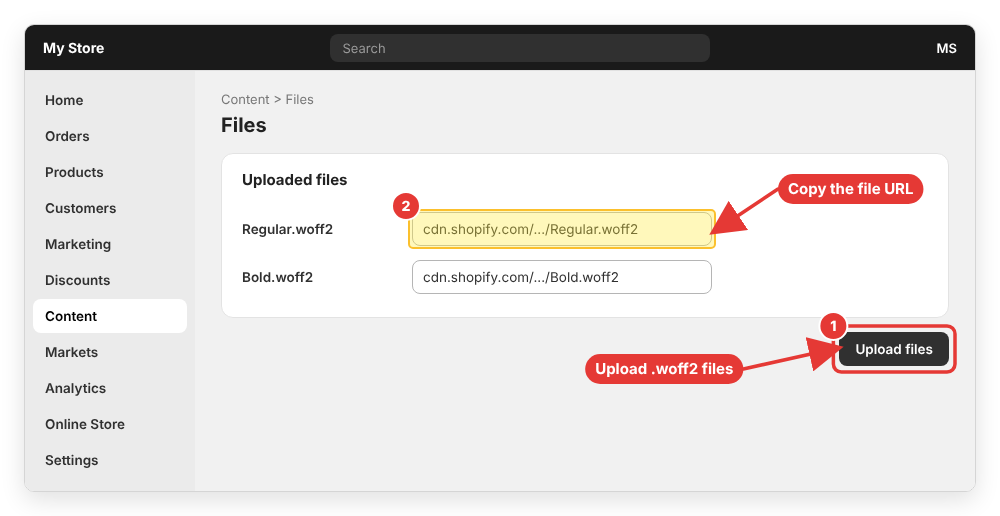
Convert your font to .woff2 (the most efficient web format) if you only have .ttf or .otf files. Then go to Content > Files in your Shopify admin, click Upload files and select the font files. After the upload finishes, copy the URL of each file. It will start with https://cdn.shopify.com/.
6.2 Load the font with custom CSS
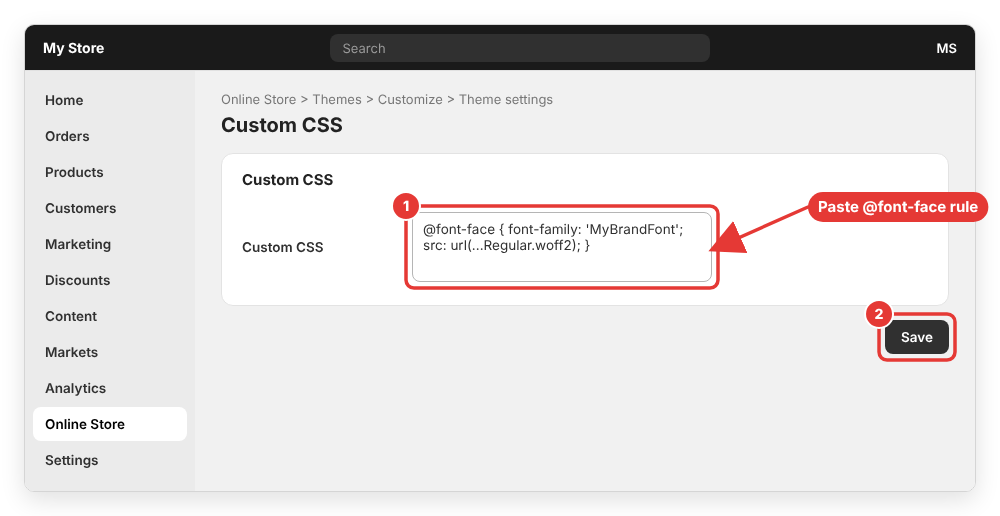
Go back to the theme editor and open Theme settings > Custom CSS. Paste an @font-face rule that points to your uploaded file, then tell the theme which elements should use the font:
@font-face {
  font-family: 'MyBrandFont';
  src: url('https://cdn.shopify.com/s/files/1/XXXX/files/MyBrandFont-Regular.woff2') format('woff2');
  font-weight: 400;
  font-display: swap;
}

h1, h2, h3, .h1, .h2, .h3 {
  font-family: 'MyBrandFont', sans-serif;
}
Replace the URL with the one you copied in step 6.1, then click Save.
Keep these Shopify limitations in mind:
- Theme-wide custom CSS is limited to 1,500 characters, and section-level custom CSS to 500 characters.
- Only
cdn.shopify.comURLs are allowed in custom CSS, which is why the font must be uploaded to Shopify first. External links such as Google Fonts URLs will not work there. @importis not supported, so you cannot import a font stylesheet.- Section-level custom CSS only allows
@media,@container,@layerand@supports, so put your@font-facerule in the theme-wide Custom CSS box.
You can read more in the official Shopify Help Center article on adding custom CSS to your theme.
Change the font of a single section
To use a different font in only one section (for example a promotional banner), click that section in the theme editor, scroll to the bottom of its settings panel and open Custom CSS. Because rules there are scoped to the section, a short rule is enough:
h2 {
  font-family: 'MyBrandFont', sans-serif;
  letter-spacing: 1px;
}
Common errors when changing fonts in Shopify
The font did not change on some pages
Some sections or apps set their own font in CSS, which overrides the theme setting. Inspect the element in your browser (right click > Inspect) to see which rule wins, then target it with a more specific selector in Custom CSS. Also make sure you edited the published theme and not a draft copy.
The custom font is not loading
- Double-check that the URL in
src: url(...)is exactly the one from Content > Files, including the?v=query string if there is one. - The
font-familyname in yourh1rule must match the name in@font-faceexactly. - If the editor shows an error when saving, you probably exceeded the 1,500 character limit or used an unsupported rule such as
@import.
The checkout still uses the old font
That is expected. The checkout is styled separately in Settings > Checkout > Customize, and theme fonts or custom CSS do not apply there.
The store feels slower after changing fonts
Each extra font weight (regular, bold, italic) is another file to download. Stick to two families and only the weights you need, prefer .woff2 files and keep font-display: swap so text stays visible while the font loads.
If you are coming from Magento, the process is very different there: fonts are usually changed in a child theme’s LESS files. You can compare it with my Magento 2 custom theme development tutorial.
Wrapping up
That’s it! Changing fonts in Shopify only takes a few minutes: open the theme editor, go to Theme settings > Typography, pick your heading and body fonts, adjust the size and save. When the font library is not enough, upload your own .woff2 files to Content > Files and load them with an @font-face rule in Custom CSS.
Which font pairing are you using on your Shopify store? If you run into any problem while changing your fonts, feel free to leave a comment below and I will help you out.