
A good Magento 2 theme can improve a store’s looking as well as user experience, which leads to improving conversion rate and sales. By default, Magento 2 use Luma theme for their default store. If you want to change the default Magento 2 theme, you can purchase a new theme from Magento 2 marketplace or from a 3rd party theme provider.
If you are a Magento 2 developer, you may want to learn the process of making a Magento 2 theme from scratch.
In this tutorial, we will go through all the steps of creating a Magento 2 theme such as: Declare theme, register theme to the system, create required theme folders, declare logo, create static files folder.
I hope this insightful tutorial will help you understand the basics of creating a Magento 2 theme
Contents
- Prerequisite
- Step 1: Create required theme directories and files
- Step 2: Declare our new theme to Magento 2 system
- Step 3: Register theme using registration.php
- Step 4: Create directories for static files like: CSS, Images, font, Javascript
- Step 5: Declare logo for your new theme
- Step 6: Configure product images size
- Step 7: Change to new theme in admin dashboard
- Conclusion
Prerequisite
We will change the Magento 2 mode to developer mode before we create the new theme to disables static view file caching + automatic code compilation. The developer mode also provide more helpful error logs on frontend so that we can fix the errors that occur when creating our new theme
To enable developer mode, run the following command
php bin/magento deploy:mode:set developer
Sample output

Note: There are also many beautiful free Magento 2 themes, I already made a list here (work well for Magento 2.4.x and 2.3.x). You can download to use for your store or use as a reference to create a new custom theme for Magento 2o
Step 1: Create required theme directories and files
First, we will create theme directories which is defined by Magento 2
app/design/frontend/<vendor_name>/<theme_name>
Replace vendor_name and theme_name with your desired names
For example: app/design/frontend/magentip/theme1
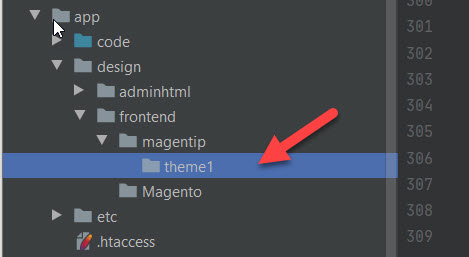
Magentip is theme vendor and theme1 is my theme name
Theme name and vendor name will be declared in our theme configuration files, so set these folders carefully.
Step 2: Declare our new theme to Magento 2 system
In this step, we will declare our new theme to the system. Theme declaration will be store in theme.xml file located in our theme folders: app/design/frontend/magentip/theme1
Create theme.xml in theme’s root folder with the following content
<theme xmlns:xsi="http://www.w3.org/2001/XMLSchema-instance" xsi:noNamespaceSchemaLocation="urn:magento:framework:Config/etc/theme.xsd">
   <title>theme1</title> <!-- your theme's name -->
   <parent>Magento/blank</parent> <!-- parent theme of the new theme in case the new theme inherits from an existing theme -->
   <media>
      <preview_image>media/preview.jpg</preview_image> <!-- path to preview image of your new theme in backend -->
   </media>
</theme>
- Replace
<title>theme1</title>with your theme’s name - Replace
<parent>Magento/blank</parent> with path to parent theme of your theme (if your new theme inherits from an existing theme. In this example, my new theme inherits fromMagento/Blanktheme - Repace
<preview_image>media/themepreview.jpg</preview_image>with the path to the preview image of your new theme. (the themepreview.jpg file is located inapp/design/frontend/<Vendor>/<theme>/media/)
The image below describes where your theme preview image display in the backend.

Step 3: Register theme using registration.php
Now we will register our new theme to database using registration.php file
Create registration.php in app/design/frontend/magentip/theme1/registration.php with the following content
<?php
/**
 * Copyright © Magento, Inc. All rights reserved.
 * See COPYING.txt for license details.
 */

use \Magento\Framework\Component\ComponentRegistrar;

ComponentRegistrar::register(ComponentRegistrar::THEME, 'frontend/magentip/theme1', __DIR__);
Replace /magentip/theme1 with your theme’s vendor and theme’s name

Step 4: Create directories for static files like: CSS, Images, font, Javascript
In this step, we will create folders that contain static files of your new Magento 2 theme including:
- CSS files
- Image files
- Font files
- Javascript files
Here is the structure of these folders:
app/design/frontend/magentip/theme1/
├── web/
│ ├── css/
│ │ ├── source/
│ ├── fonts/
│ ├── images/
│ ├── js/
- web/css: store your theme’s css files
- web/fonts: Store website’s font files
- web/image: store website’s image files, like theme’s logo image…
- web/js: store website’s javascript files
If your theme contains modules files you can put these files in corresponding folders such as /<theme>/<Namespace_Module>/web/css
For example: /theme1/module_1/web/css
Note: These static files are cached in pub/static and var/view_preprocessed directories, so if you make changes to files/folder in /web folder, you need to remove all files/folder in pub/static and var/view_preprocessed directories. If not, you will not see the changes and the old versions will be displayed on the frontend.
Step 5: Declare logo for your new theme
By default, Magento 2 uses logo.svg file as logo in frontend, and logo.svg is located in <theme_dir>/web/images/logo.svg
If your new theme uses the default logo.svg file as logo file, there no need to declare logo. Just set file name as logo.svg and put it in <theme_dir>/web/images/logo.svg
If you want to use custom logo for your theme, you will need to declare custom logo in default.xml file located in <theme_dir>/Magento_Theme/layout/default.xml
For example, with the theme I create in this tutorial, the default.xml file should be in: app/design/frontend/magentip/theme1/Magento_Theme/layout/default.xml
To declare a logo with the size 80×80, add the following content to default.xml
<page xmlns:xsi="http://www.w3.org/2001/XMLSchema-instance" xsi:noNamespaceSchemaLocation="urn:magento:framework:View/Layout/etc/page_configuration.xsd">
    <body>
        <referenceBlock name="logo">
            <arguments>
                <argument name="logo_file" xsi:type="string">images/magentip_logo.png</argument>
                <argument name="logo_width" xsi:type="number">80</argument>
                <argument name="logo_height" xsi:type="number">80</argument>
                <argument name="logo_alt" xsi:type="string">Logo name</argument>
            </arguments>
        </referenceBlock>
    </body>
</page>
Replace images/magentip_logo.png with your logo file name
Step 6: Configure product images size
In Magento 2, we can easily configure product image size, background color… on the storefront using etc.xml file
For example, you can make the category grid view product images square by specifying a size of 250 x 250 pixels:
<?xml version="1.0"?>
<view xmlns:xsi="http://www.w3.org/2001/XMLSchema-instance" xsi:noNamespaceSchemaLocation="urn:magento:framework:Config/etc/view.xsd">
    <media>
        <images module="Magento_Catalog">
        ...
        <image id="category_page_grid" type="small_image">
            <width>250</width>
            <height>250</height>
        </image>
        <image id="new_products_content_widget_grid" type="small_image">
            <width>200</width>
            <height>200</height>
         </image>
    </media>
    ...
</view>
id="category_page_grid" describe the location of the image and and type="small_image" is the type of image specified by id
This file can contain multiple image ids and image types.
Step 7: Change to new theme in admin dashboard
Now we will switch to the new theme. In admin dashboard go to Content > Design > Configuration

Select Main Website – Default store view and click on the edit button
In Applied theme, select the theme we have just created, in this tutorial it is Theme1
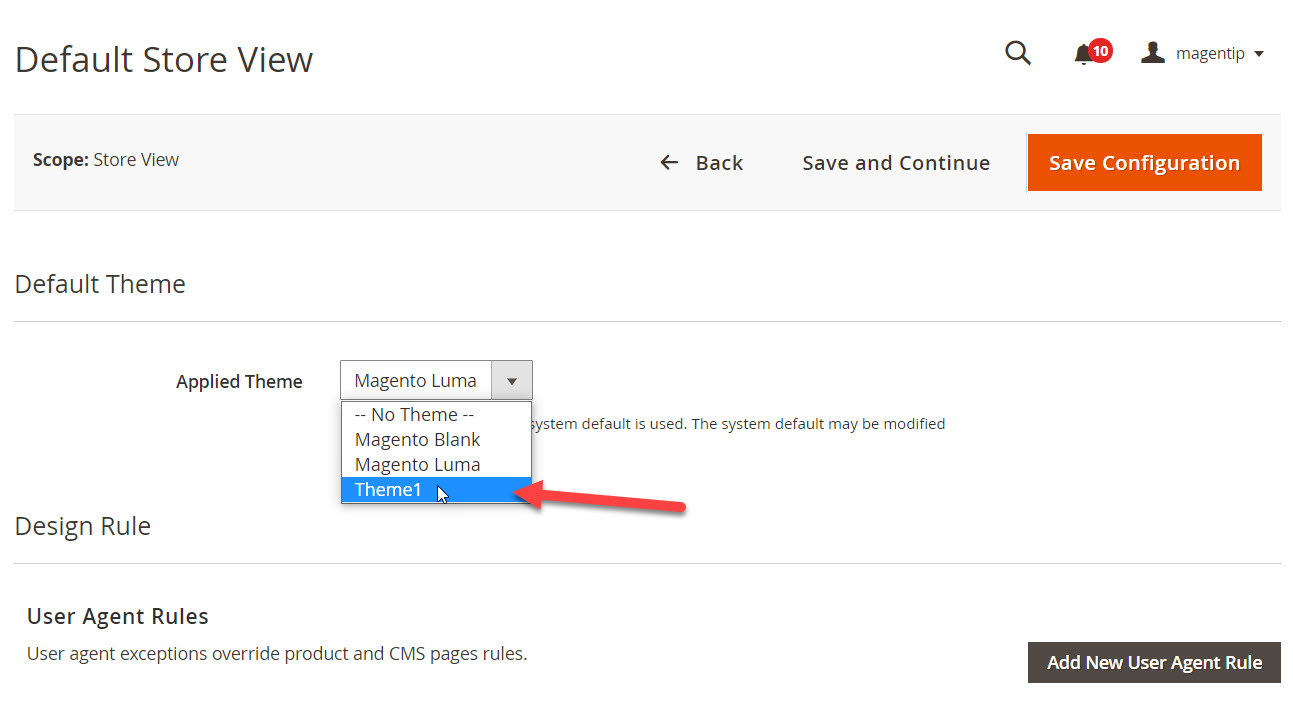
Click on Save configuration to apply the change
Now we will upgrade database, deploy static content to display this new theme on the storefront
Upgrade database:
php bin/magento setup:upgrade
Deploy static content
php bin/magento setup:static-content:deploy
Clean cache and flush cache
php bin/magento cache:clean
php bin/magento cache:flush
Now go to your storefront to see if the new theme is applied.

This is just a basic theme with blank layout, in the upcoming tutorials, we will learn how to create a theme with full layout.
Conclusion
Understanding the process of creating a new custom Magento 2 theme is essential if you want to create or customize your own Magento 2 theme.
In case you want to use a premade theme instead of creating your own theme, you can purchase a new theme from Magento 2 marketplace or from 3rd party theme providers like ThemeForest. Learn how to install new Magento 2 theme from zip file here.
If you have any problems when creating a custom theme for Magento 2, please drop a comment below describing your problem and I will be happy to help.
 with Elasticsearch")
")
