
Shipping is one of the first things you need to get right before your store goes live. If your rates are too low, you lose money on every order; if they are too high or missing, customers abandon the checkout. In this tutorial, we will learn how to set up shipping rates in Shopify step by step: how shipping profiles and zones work, how to add flat, weight-based and price-based rates, how to offer free shipping, and how to use carrier-calculated rates.
Previously, I published a tutorial on how to add products and variants in Shopify. Make sure each physical product has a correct shipping weight before you continue, because weight-based and carrier-calculated rates depend on it.
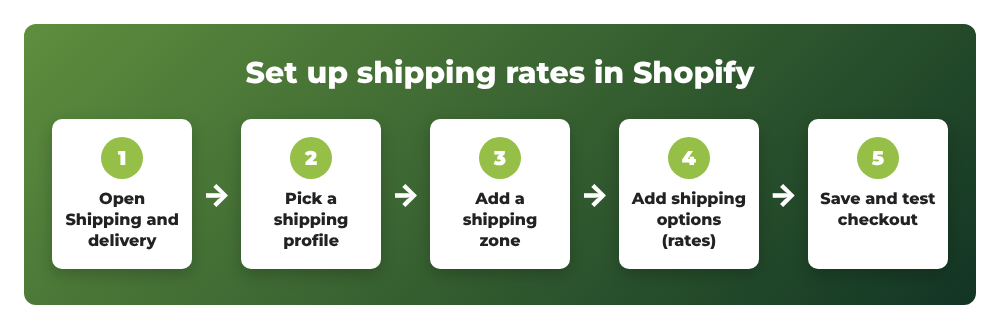
Here is the whole process at a glance:
Contents
- How shipping rates work in Shopify
- Step 1: Open the Shipping and delivery settings
- Step 2: Choose a shipping profile
- Step 3: Create a shipping zone
- Step 4: Add a shipping rate to the zone
- Step 5: Use carrier-calculated shipping rates (optional)
- Step 6: Create a custom shipping profile for special products
- Step 7: Save and test your shipping rates
- Common errors
- Wrapping up
How shipping rates work in Shopify
Before clicking anything, it helps to understand the three building blocks Shopify uses:
- Shipping profile – a group of products that share the same rates. Every store has a General profile by default; any product that is not in a custom profile uses its rates. You can create up to 99 custom profiles (for example for heavy or fragile items).
- Shipping zone – a group of countries or regions inside a profile, for example “United States” or “Europe”. A country can belong to only one zone within the same profile.
- Shipping option (rate) – the actual price the customer sees at checkout, like “Standard Shipping – $5.99” or “Express – $14.00”. Each zone can have several options.
Note: Shopify is gradually moving some stores from shipping profiles to shipping options by market. If your admin looks different from the screens below, your store may already be upgraded – the concepts (regions, rate type, price, conditions) stay the same.
Step 1: Open the Shipping and delivery settings
From your Shopify admin, go to Settings > Shipping and delivery. This page contains your shipping profiles, local delivery, pickup in store and package settings. You need the Manage settings permission (and Products for custom profiles); store owners have both by default.
Step 2: Choose a shipping profile
In the Shipping profiles section, click the General profile to edit the rates that apply to most of your products. If you only sell one kind of product, the general profile is all you need.
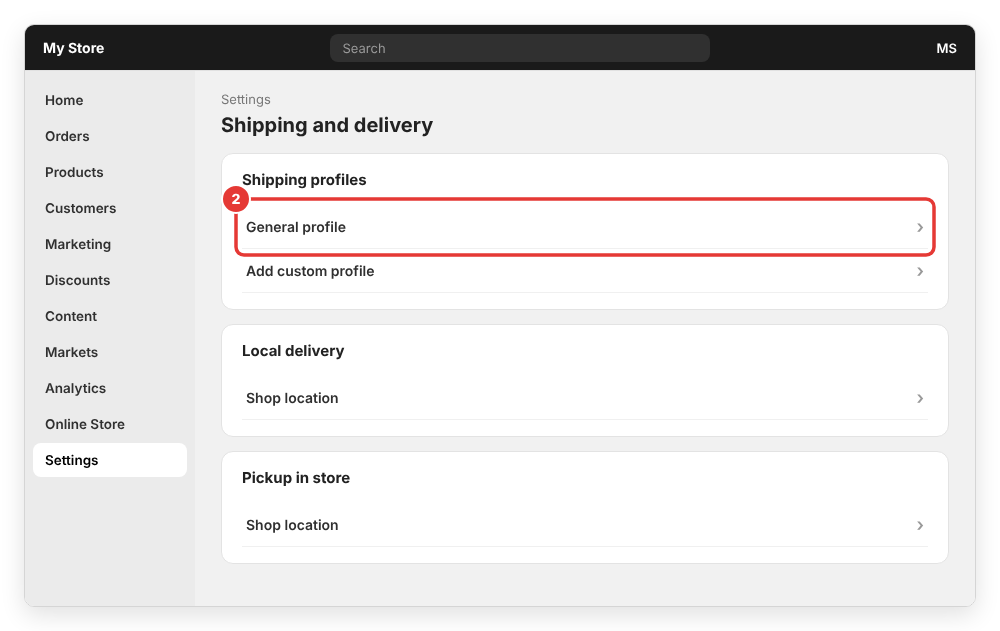
If some products need different rates (bulky furniture, a free-shipping product, items shipped from another warehouse), click Add custom profile instead – I explain that in Step 6.
Step 3: Create a shipping zone
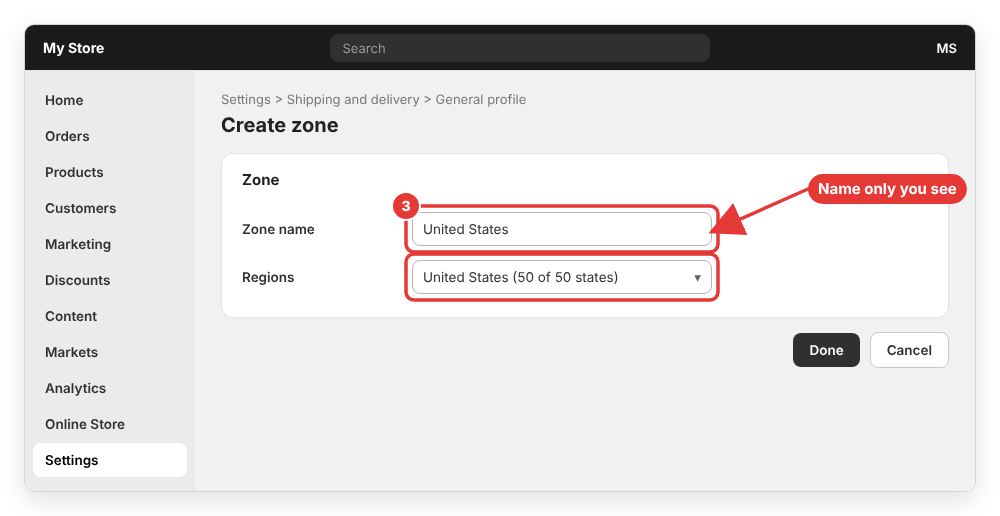
Inside the profile, scroll to the Shipping zones section and click Add zone:
- In the Zone name field, enter a name such as
United StatesorEurope. Customers never see the zone name, so name it for yourself. - In the Regions section, select the countries and regions (states/provinces) the zone covers.
- Click Done.
Important: a zone only works if the country is also part of an active market. If you add a country to a zone but not to a market, customers from that country still can’t check out. You can check this under Markets.
Step 4: Add a shipping rate to the zone
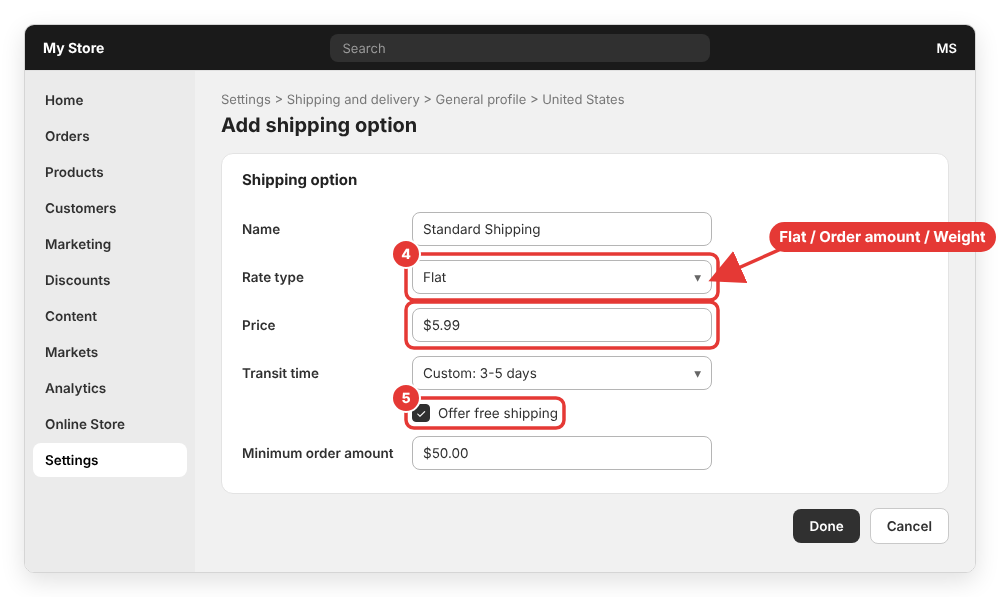
Next to the zone, click Add shipping option (on some stores this button is labeled Add rate). Fill in the dialog:
- Name – the name customers see at checkout, for example
Standard ShippingorExpress Shipping. Optionally click Add delivery details to show a short note like “Tracked shipping”. - Rate type – choose how the price is calculated:
- Flat – one fixed price per order. Enter it in Price. Enter
0(or leave it empty) for a free rate. - Order amount – the price depends on the order value. Each tier has a Minimum, Maximum and Price.
- Weight – the price depends on the total weight of the items in the cart, again with Minimum / Maximum / Price tiers.
- Carrier or app calculated – real-time rates from a carrier or a shipping app (see Step 5).
- Flat – one fixed price per order. Enter it in Price. Enter
- Transit time (optional) – pick a transit time or choose Custom and enter a range like
3-5 days. - Click Done, then click Save at the top of the profile page.
Offer free shipping over a minimum order amount
The most common setup is “flat rate, but free over $50”. In the same dialog, select Offer free shipping and enter the minimum order amount (for example $50.00). Orders below that amount pay the flat price; orders at or above it ship for free.
A few rules to remember:
- A free rate with no conditions applies to every order it covers.
- Price tiers use the discounted subtotal before tax, so a discount code can drop an order below your free-shipping threshold.
- If you want free shipping only for specific products, put those products in a custom profile with a free rate. For specific customers, use a free shipping discount code instead.
Weight-based and price-based tiers
If your products have very different weights, a single flat rate is rarely fair. Choose Weight as the rate type and add tiers with the plus icon, for example:
Tier 1:  0 kg  - 1 kg       -> $5.00
Tier 2:  1 kg  - 5 kg       -> $9.00
Tier 3:  5 kg  - (no max)   -> $15.00
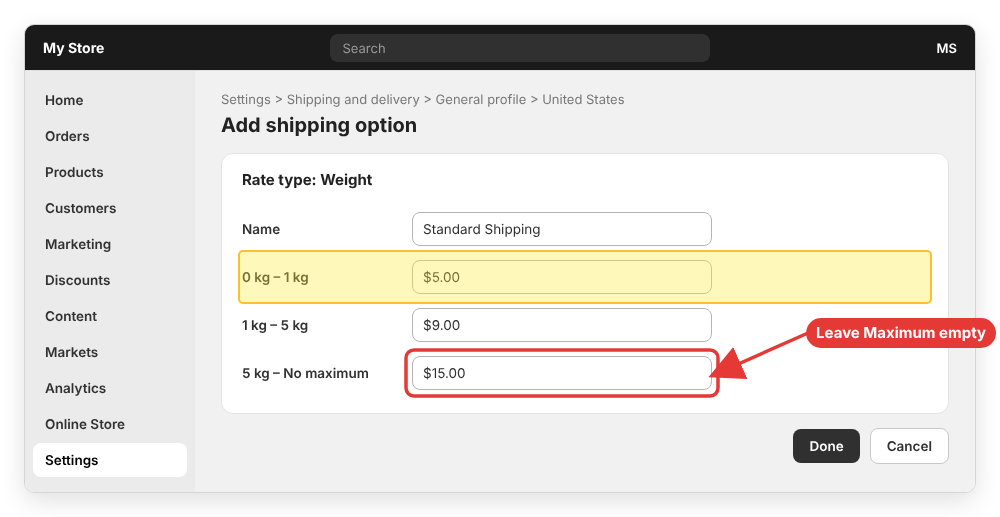
Always leave the Maximum field empty on the highest tier. If the top tier has a maximum and a cart goes over it, no rate matches and the customer gets a shipping error at checkout. Also avoid gaps between tiers (for example 0–1 kg and 2–5 kg): a cart that falls into the gap gets the next higher tier’s price, which looks like a random overcharge. The same logic applies to Order amount tiers.
Step 5: Use carrier-calculated shipping rates (optional)
Instead of fixed prices, you can show live rates from carriers. In the Add shipping option dialog:
- Set Rate type to Carrier or app calculated and click Choose carrier and apps.
- In the Carrier or app drop-down, select a carrier (for example USPS, UPS or DHL in the US, Canada Post in Canada, Royal Mail in the UK) or an installed shipping app.
- Select the services you want to show. Optionally select Automatically include new services when they become available.
- In the Handling fee section, add a percentage and/or fixed amount to cover packaging. A negative value gives the customer a discount.
- Click Done, then Save.
Shopify’s built-in carrier integrations are available on all plans in supported countries. If you want to connect your own carrier account (for example your negotiated FedEx or UPS rates), you need third-party carrier-calculated shipping, which depends on your plan or an additional monthly fee – check the current Shopify pricing page before you plan around it.
Carrier rates are only as accurate as your data: set a correct weight on every product and a realistic default package in Settings > Shipping and delivery.
Step 6: Create a custom shipping profile for special products
When a group of products needs its own rates, create a custom profile:
- Go to Settings > Shipping and delivery and click Add custom profile.
- Enter a Profile name, for example
Oversized items. - In the Products section, select the products or variants and click Done.
- Review the Fulfillment locations, then add zones and rates exactly like Steps 3–4.
- Click Save.
A product can belong to only one profile; adding it to a new profile removes it from the old one. When a cart contains products from several profiles, Shopify combines the rates at checkout, and rates with exactly the same name (case-sensitive) are merged into one line. So if you want “Standard Shipping” from two profiles to be added together, give both rates the same name.
Step 7: Save and test your shipping rates
Click Save, then open your storefront, add a few products to the cart and go to checkout with addresses from each zone. Check that:
- Each zone shows the rates you expect.
- The free shipping threshold kicks in at the right subtotal.
- Heavy carts get the correct weight tier.
Use a fresh checkout for every test – abandoned checkouts keep the rates from the moment they were created. Once orders start coming in, you may also need to know how to change the shipping address on a Shopify order, because Shopify does not recalculate the shipping rate when you edit an address.
Common errors
“Your order cannot be shipped to the selected address”
No rate matches the customer’s address or cart. Check that the country/region is inside a zone of the right profile, that the country is in an active market, and that at least one rate covers the cart’s weight or price (remember: no maximum on the top tier).
Shipping rates are not showing at checkout
- The cart contains only digital products or services – Shopify doesn’t ask for shipping on those.
- A physical product has no weight or the wrong unit (lb vs kg). Fix the Shipping weight on the product.
- The product isn’t stocked at a location that fulfills online orders. In Settings > Locations, make sure the location is active, has a valid address and has Inventory at this location is available to fulfill online orders turned on.
- A shipping app created its own profile and overrides your rates. Move the products back to your profile.
Shipping price is higher than expected
Usually a gap between tiers, a discount code that moved the order into another price tier, or rates merged from multiple profiles. If you changed your store currency, delete and recreate the rates, because existing rates keep the old currency.
If a customer was overcharged for shipping, you can refund the difference – see my guide on how to cancel and refund an order in Shopify. For more details, see the official Shopify Help Center article on setting up shipping zones and rates.
Wrapping up
That’s how to set up shipping rates in Shopify: go to Settings > Shipping and delivery, open the General profile (or a custom one), add a zone, add shipping options with the right rate type – flat, order amount, weight or carrier calculated – and click Save. Finish by testing checkout with addresses from every zone.
If you are not sure which rate structure fits your products, or your rates still don’t appear at checkout, feel free to leave a comment below and I will try to help.