Magento 2 provides 4 different modes including
- Default: Default mode, no change but not recommend for production environment
- Developer: This is mode is dedicated for Magento 2 developers. In this mode, static view file caching is disabled, stronger debug system. In this mode, errors will be also displayed on the frontend. Also, this mode enables automatic code compilation. With many options enabled, this mode results in the slowest performance.
- Maintenance: We use this mode when we make changes on Magento 2. It does not allow customers to access our website during maintenance mode. I also explained how to change Magento 2 to maintenance mode here
- Production: This mode is for live site, all debug messages are hidden and it serves static view files from cache only to enhance load speed of website.
That means developer mode is the best option for developer who are working around to debug error, make significant system changes like installing new extensions, theme or changing Magento 2 hosting.
In this tutorial, I will explain how to enable or disable Magento 2 developer mode using 4 different methods, just choose whichever one you want.
Contents
Check the current mode Magento 2 using
We use this command to check current mode of your Magento 2 website
bin/magento deploy:mode:show
Sample output:
- Production mode
Current application mode: Production. (Note: Environment variables may override this value.)
- Developer mode
Current application mode: Developer. (Note: Environment variables may override this value.)
- Maintenance mode
Current application mode: Maintenance. (Note: Environment variables may override this value.)
If Magento 2 is already in developers mode, you won’t need to make change.
Change Magento 2 mode to developer mode
There are 2 methods to change Magento 2 mode to developer mode, use whichever you feel comfortable
Method 1: Using command in Magento 2 CLI
To change mode using Magento 2 CLI, follow these steps
Step 1: Connect to your server using SSH protocol
Step 2: Remove all content in /generated/metadata/ and /generated/code/ folders.
You can either use file manager or use command to remove files
rm -rf <pathtomagento2website>/generated/metadata/* <pathtomagento2website>/generated/code/*
Or
This step is important because those 2 folders will store code changes of each mode and dependency injection configuration for all Magento 2 modules.
Step 3: Run the follow command
php bin/magento deploy:mode:set developer
If you succeed, the following message is displayed
Enabled developer mode.
Now refresh your website to apply change.
Method 2: Change Magento 2 developer mode using env.php file
We can also switch between every modes in Magento 2 using env.php file. (remember this file? it’s an important file to adjust magento 2 database configuration info)
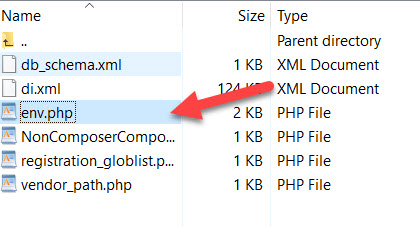
Step 1: Open file manager and locate env.php in app/etc/ folder
Step 2: Edit env.php file with a text editor and find these lines
    ),
'x-frame-options' => 'SAMEORIGIN',
'MAGE_MODE' => 'default',
'cache_types' =>
    array (
Replace 'MAGE_MODE' => 'default', with the mode you want. In this tutorial, we want to change developer mode so the syntax should be
    ),
'x-frame-options' => 'SAMEORIGIN',
'MAGE_MODE' => 'developer',
'cache_types' =>
    array (
Finally, save changes to env.php file and refresh your website to see changes.
Note: if you don’t see new mode applied, flush cache to fix it.
Method 3: Change magento 2 developer mode using virtual host file (.htaccess for apache and nginx.conf for nginx)
Another method to change mode of Magento 2 is to use virtual host file.
For apache user
Locate .htaccess file in root folder of your Magento 2 installation, uncomment the line
############################################
## overrides deployment configuration mode value
## use command bin/magento deploy:mode:set to switch modes

# SetEnv MAGE_MODE developer

############################################
To
SetEnv MAGE_MODE developer
Save file and now your Magento 2 website is already put into developer mode. Also, remember to set AllowOverride On to make setting work.
For Nginx user
If your website is using Nginx as web server, changing .htaccess won’t work for you.
Go to nginx configuration file of your site located in /etc/nginx/sites-available/your_web_site.conf and edit it with a file editor.
Look for the following lines
server {
   listen 80;
   server_name magentip.magento2.com;
   set $MAGE_ROOT path/to/magento2website;
   include other/configurations/file.conf;
}
and add this line: set $MAGE_MODE developer;
Now the Nginx config file should be like this
server {
   listen 80;
   server_name magentip.magento2.com;
   set $MAGE_ROOT path/to/magento2website;
   set $MAGE_MODE developer;
   include other/configurations/file.conf;
}
Save file and restart nginx to apply changes.
service nginx restart
Method 4: Change magento 2 developer mode using index.php file
We can use index.php file of Magento 2 to change mode (I do not recommend this method because it changes core file of Magento 2 – Remember to backup if you want to try this method)
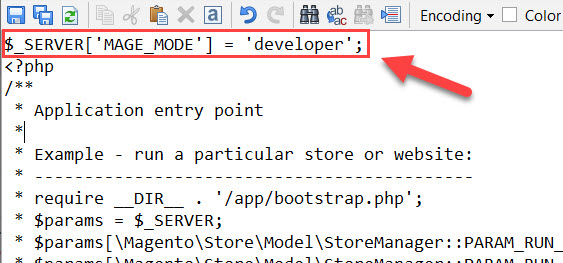
Edit index.php file with a text editor and add the following line at the top of the file
$_SERVER['MAGE_MODE'] = 'developer';
The file will be like this
For your reference:
$_SERVER['MAGE_MODE'] = 'developer';
<?php
/**
 * Application entry point
 *
 * Example - run a particular store or website:
 * --------------------------------------------
Refresh your website to see change.
Disable Magento 2 developer mode
To disable developer mode and switch back to default or production mode, just change developer value to default or production mode
Command line to change to production / default mode
bin/magento deploy:mode:set production
If you succeed, the following message will be displayed
Enabled maintenance mode
Requested languages: en_US
=== frontend -> Magento/luma -> en_US ===
... more ...
Successful: 1884 files; errors: 0
---

=== frontend -> Magento/blank -> en_US ===
... more ...
Successful: 1998 files; errors: 0
---

=== adminhtml -> Magento/backend -> en_US ===
... more ...
---

=== Minify templates ===
... more ...
Successful: 992 files modified
---

New version of deployed files: 1845463232
Static content deployment complete Gathering css/styles-m.less sources. Successfully processed LESS and/or   <span term-uuid="2345sdas1-91cd-4789-a8b5-asf2asxc32f" class="glossary-term" data-toggle="popover">Sass</span>  files   <span term-uuid="6c5cb4e9-9197-45654-ba79-654678752gddd" class="glossary-term" data-toggle="popover">CSS</span>  deployment complete Generated classes:
    Magento\Sales\Api\Data\CreditmemoCommentInterfacePersistor
    Magento\Sales\Api\Data\CreditmemoCommentInterfaceFactory
    Magento\Sales\Api\Data\CreditmemoCommentSearchResultInterfaceFactory
    Magento\Sales\Api\Data\CreditmemoComment\Repository
    Magento\Sales\Api\Data\CreditmemoItemInterfacePersistor
    ... more ...
Compilation complete
Disabled maintenance mode
Enabled production mode.
Note the last line
Enabled production mode.
Do the same if you want to change to default mode
Disable developer mode using env.php
In env.php file, change Magento 2 from developer mode to production/default mode by changing this line.
Production
'MAGE_MODE' => 'production',
Default
'MAGE_MODE' => 'default',
Disable developer mode using web server configuration file
To disable Magento 2 developer mode in Apache or Nginx, simply change the line
Apache
From
SetEnv MAGE_MODE developer
To
SetEnv MAGE_MODE production
Nginx
From
set $MAGE_MODE developer;
To
set $MAGE_MODE production;
Disable developer mode using index.php file
To disable developer mode using index.php file, just remove the added line or change it to
$_SERVER['MAGE_MODE'] = 'production';
Save file to see change.
Conclusion
Magento 2 offers many modes, it’s important to learn how to take advantage of each mode so that you can quickly make Magento 2 work the way you want.
If you have any trouble when changing Magento 2 to developer mode, just drop a line below to describe your problem. I will try my best to give solution.


1 Comment
Another method to change to developer mode for php-fpm user is add the following line to php-fpm configuration file