
A flat header menu with ten links is hard to scan, especially when your catalog grows to several collections. The solution is a drop-down menu: one top-level item such as “Shop” that opens a list of collections when the customer hovers or taps it. In this tutorial, we will learn how to add a drop-down menu in Shopify, how to add collections to the menu, how to choose between a dropdown and a mega menu in your theme, and what to check when the drop-down doesn’t show up.
Previously, I published a tutorial on how to add products and variants in Shopify. Once your products are grouped into collections, a drop-down menu is the easiest way to help customers find them.
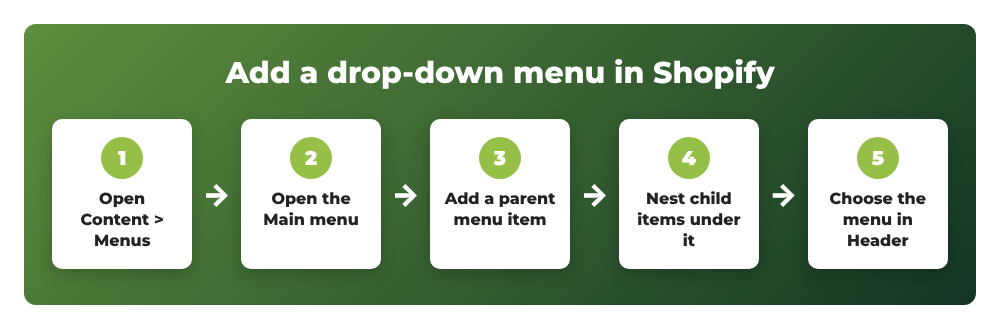
Here is the whole process at a glance:
Contents
Before you start
Shopify menus can only link to things that already exist. Before you build the drop-down, create the items you want to link to:
- Collections – in Products > Collections (for example “T-shirts”, “Hoodies”, “Accessories”).
- Pages – in Online Store > Pages (for example “About us”, “Size guide”).
- Blogs, products or policies you want in the menu.
A few limits worth knowing: a menu can contain up to 10,000 items and a store up to 1,000 menus, but Shopify recommends seven or fewer top-level items for a clean header. Drop-downs support up to two levels of nesting under a top-level item, although some themes need customization to display the third level.
Step 1: Go to Content > Menus
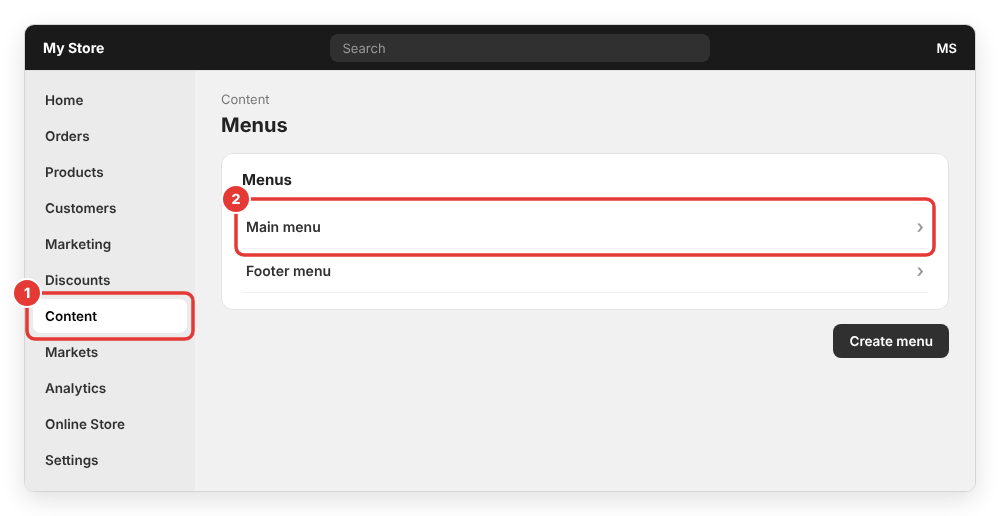
From your Shopify admin, click Content > Menus. (In older versions of the admin this page was under Online Store > Navigation; the menu editor itself works the same way.) You will see your existing menus, usually Main menu and Footer menu.
Click Main menu – this is the menu most themes show in the header. If you want to build a completely new menu, click Create menu instead, but remember you will need to select it in the theme header later (Step 5).
The parent item is the label customers see in the header, for example Shop. Click Add menu item, then:
- In the Name field, enter the label, for example
Shop. - In the Search or paste a link field, enter
#if the parent item should only open the drop-down and not go to a page. Alternatively, link it to a page such as Collections > All collections. - Click Add.
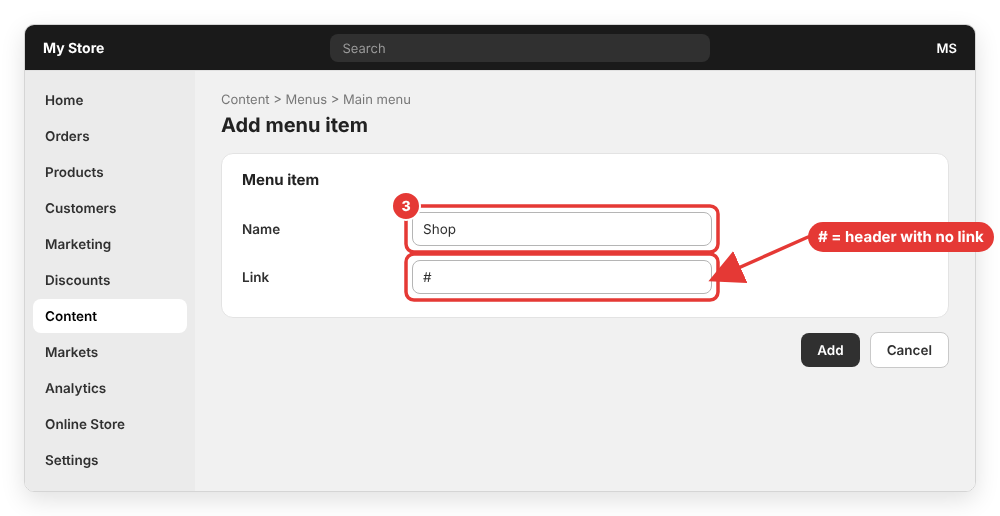
Why use #? Most themes turn drop-down headers into buttons, so a link on the parent item is often not clickable on desktop, and on mobile a real link can send the customer to another page instead of opening the sub-menu. If you want customers to reach a page like “All products”, add it as the first item inside the drop-down.
Step 4: Add child items and nest them under the parent
Now add the links that will appear inside the drop-down. For each one, click Add menu item again:
- Click the Search or paste a link field and choose a link type, for example Collections.
- Select a specific collection (for example
T-shirts) or All collections. The Name is filled automatically with the collection title – you can change it. - Click Add.
New items are added at the bottom of the menu at the top level. To turn them into drop-down items, click the drag handle (the six dots on the left of each item) and drag the item under and slightly to the right of the parent item until it appears indented. Repeat for every child item, then click Save menu.
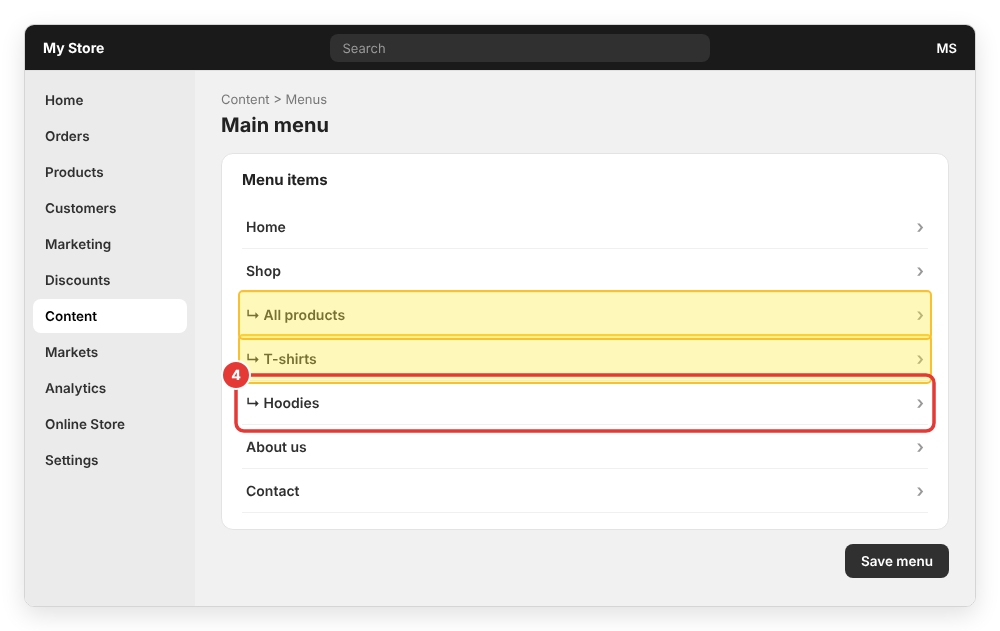
The structure of a typical clothing store menu looks like this:
Home                  -> Home page
Shop                  -> #
    All products      -> Collections > All products
    T-shirts          -> Collections > T-shirts
    Hoodies           -> Collections > Hoodies
        Zip hoodies   -> Collections > Zip hoodies   (2nd nested level)
About us              -> Pages > About us
Contact               -> Pages > Contact
Tip: the menu editor has a limit of 200 changes before you must save (each add, edit, delete or move counts as one change). When building a large menu, click Save menu regularly.
How to add a collection to the drop-down menu
Adding a collection to a Shopify menu is exactly Step 4: Add menu item > Search or paste a link > Collections and pick the collection. When you select a specific collection you can also filter it by tags, so a link like “Hoodies – Black” only shows products that have all the tags you enter. If you later delete the collection, its menu item is deleted too, so double-check the menu after cleaning up your catalog.
Your drop-down is saved, but the theme must use the right menu. Go to Online Store > Themes, click Customize on your live theme and select the Header section:
- In the Menu setting, select
Main menu(or the new menu you created). - In Dawn and many other free Shopify themes, the Desktop menu type setting lets you pick Dropdown, Mega menu or Drawer. Dropdown shows a classic list; Mega menu shows all child and grandchild links in a wide panel, which works well for stores with many collections.
- Click Save.
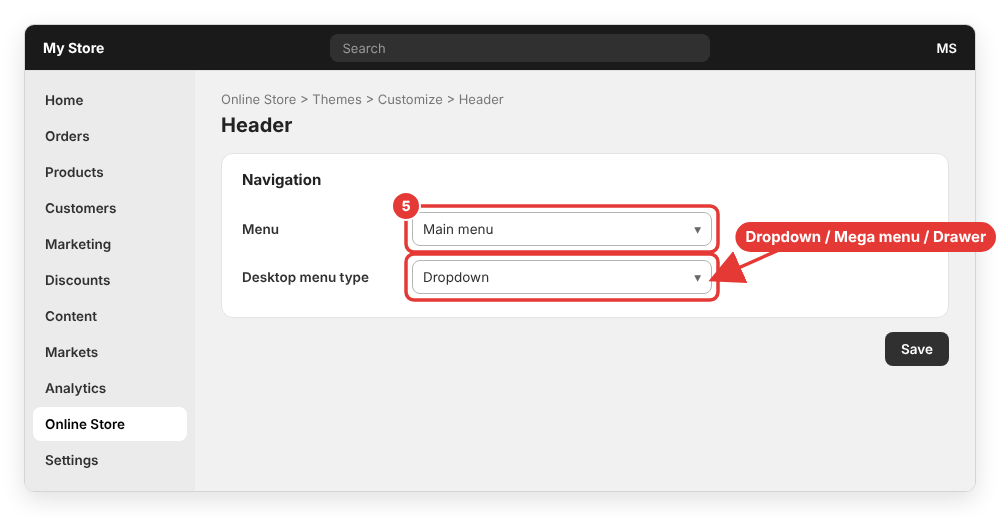
Setting names vary between themes, so if you don’t see Desktop menu type, check your theme’s documentation. Coming from Magento? In Magento 2 a mega menu usually needs an extension (see my list of the best Magento 2 megamenu extensions), while in Shopify most modern themes include a basic mega menu out of the box.
Step 6: Test the drop-down on desktop and mobile
Open your storefront and check the header:
- On desktop, hover or click the parent item and make sure all child links appear in the right order.
- On mobile, open the menu drawer and tap the parent item – it should expand the sub-menu instead of loading a new page.
- Click each child link and confirm it opens the correct collection or page.
Common errors
The drop-down menu is not showing
Usually the child items are not actually nested. In Content > Menus, make sure each child item is indented under the parent, then click Save menu. Also confirm that the Header section of your theme uses the menu you edited – a common mistake is editing Main menu while the header is set to another menu.
The parent link opens a page on mobile instead of the sub-menu
Set the parent item’s link to #, as described in Step 3, and add the destination page as the first child item instead.
The third level doesn’t appear
Shopify supports two nested levels, but not every theme displays them. Switch the Desktop menu type to Mega menu if your theme has it, or check your theme documentation.
“Menu cannot contain nested menus”
This message can appear on some stores created before 2018 that never had nested navigation enabled. Contact Shopify Support to turn the feature on.
Drop-down links don’t appear in the footer
Most themes show only top-level items in footer menus, so build footer menus as simple flat lists.
For more details, see the official Shopify Help Center article on setting up drop-down menus in your online store.
Wrapping up
That’s how to add a drop-down menu in Shopify: go to Content > Menus, open the Main menu, add a parent item with the link #, add your collections and pages as menu items, drag them under the parent, click Save menu and make sure the theme Header uses that menu. For larger catalogs, try the mega menu option in your theme.
If your drop-down still doesn’t show or you need help organizing a big menu, feel free to leave a comment below and I will try to help.