
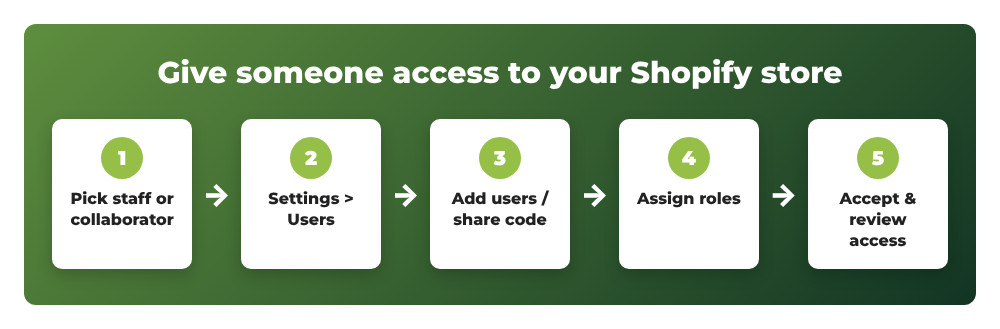
Sooner or later, every growing store needs a second pair of hands. Maybe you hired a virtual assistant to process orders, or you are working with a developer or agency who needs to edit your theme. The worst thing you can do is share your own owner login. Shopify gives you two safe ways to give people access instead: staff accounts (called users in the current admin) and collaborator accounts.
In this tutorial, we will learn how to add a collaborator in Shopify and how to add a staff account, step by step: where to find the collaborator request code, how to invite a user, how to assign roles and permissions, and how to remove access when the job is done.
Previously, I published a tutorial on how to remove the password page and launch your Shopify store. Once your store is live, bringing in help is usually the next step.
Contents
Staff account vs collaborator account: which one do you need?
Before clicking anything, decide which type of access fits the person you want to add:
- Staff account (admin user) is for people who work for your business: employees, a VA, a family member helping with orders. You invite them by email, and they log in with their own Shopify account. Staff accounts count toward the user limit of your plan.
- Collaborator account is for Shopify Partners, such as freelancers, developers, designers and agencies. They request access from their Partner Dashboard using a 4-digit code that you give them. Collaborator accounts do not count toward your plan’s user limit.
A quick rule of thumb: if the person has a Shopify Partner account, use a collaborator account. Everyone else gets a staff account.
Also note the plan limits. According to the Shopify Help Center guide on inviting users, stores on the Starter and Basic plans can’t add extra users, so if the Add users button is missing for you, check your plan first. Collaborators are still available on those plans.
How to add a staff account in Shopify
Step 1: Open Settings > Users
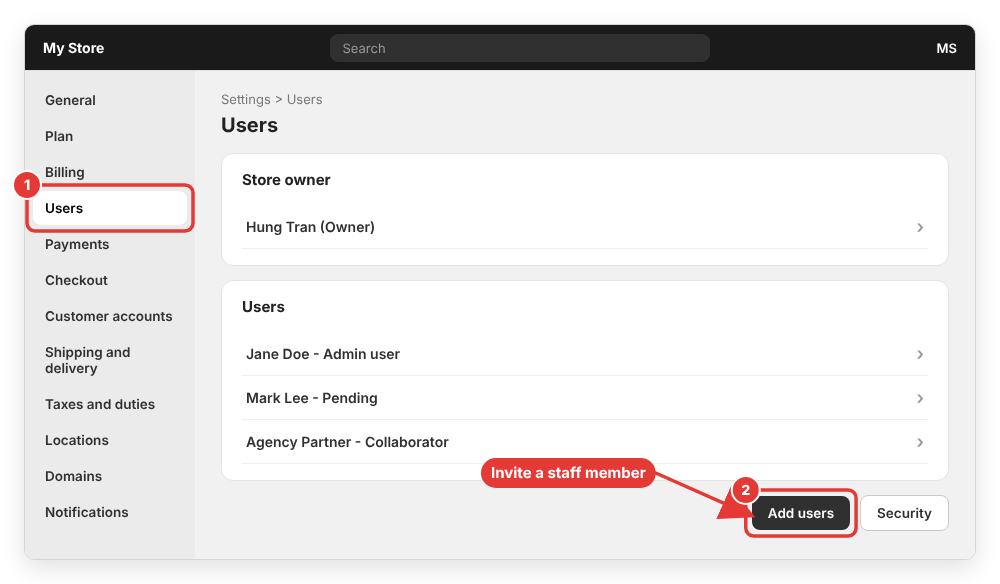
From your Shopify admin, click Settings in the bottom-left corner, then click Users. If your store is not part of an organization, this page may be labelled Users & permissions. Here you will see the store owner, every existing user and every collaborator.
Only the store owner and users with the Administrator role can manage users, so make sure you are logged in with the right account.
Step 2: Click Add users
Click the Add users button. If you do not see it, your plan probably does not allow additional users (see the note above).
Step 3: Enter the staff member’s email
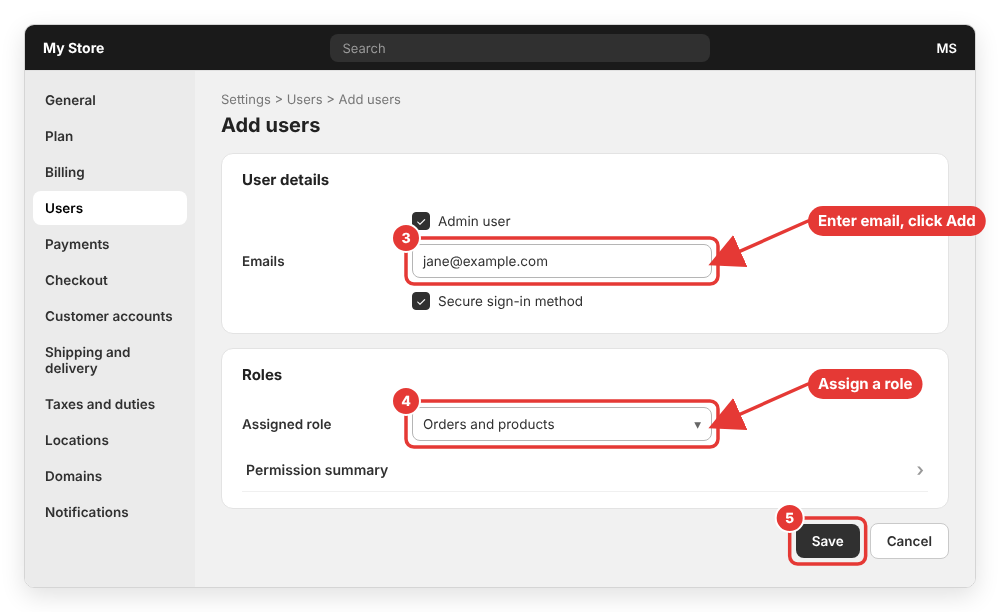
In the User details section, make sure Admin user is selected. Then type the person’s email address in the Emails field and click Add. You can add several email addresses at once if you want to invite multiple people with the same roles.
The Secure sign-in method toggle is turned on by default. I recommend keeping it on, because it requires the user to sign in with a more secure method. (It does not apply to Shopify POS.)
Step 4: Assign roles and permissions
In the Roles section, click Assign and pick a role, or create a new one. Roles are bundles of permissions, for example a role that can only manage Orders and Products. You can click Assign again to add more roles to the same user.
Before saving, open the Permission summary to double-check what the person will be able to see and do. Follow the principle of least privilege: a person who packs orders does not need access to Settings, Apps or financial reports.
On Shopify Plus, this section is called Roles and groups, and you can also assign the user to groups.
Step 5: Save and send the invitation
Click Save. Shopify sends an invitation email to the new user, who must click the link and finish setting up their account. Until they do, the user is shown with a Pending status on the Users page.
The invitation link expires after 7 days. If it expires, remove the pending user and add them again to send a fresh invite.
How to add a collaborator in Shopify
Since December 2023, a Partner can’t request access to your store without a collaborator request code. This is good for security: only people you give the code to can even send a request.
Step 1: Find your collaborator request code
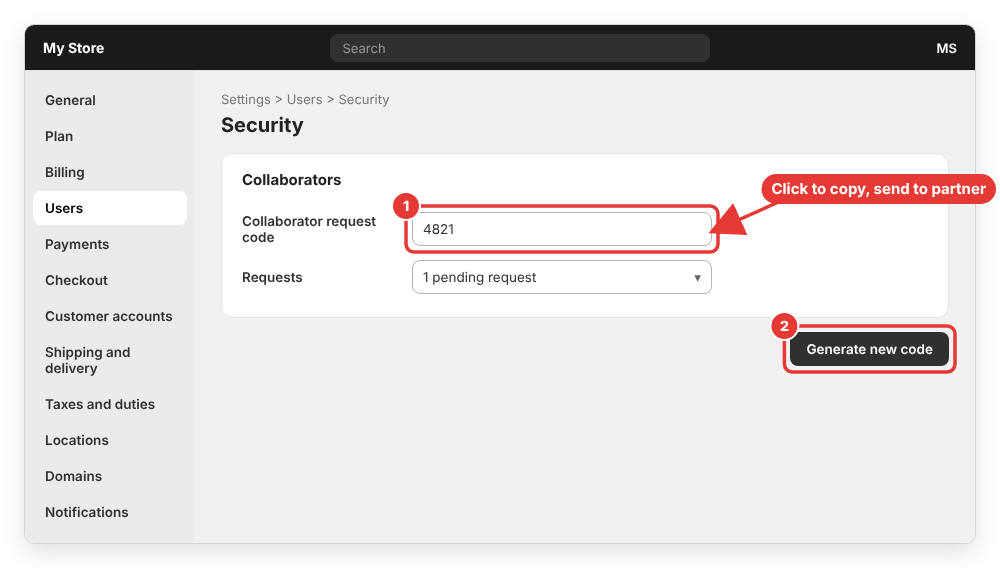
Go to Settings > Users, then click Security. In the Collaborators section, click the 4-digit code to copy it, and send it to your developer or agency through a channel you trust.
If you think the code has been shared with the wrong person, click Generate new code. The old code stops working immediately.
Step 2: The Partner sends a collaborator request
Your partner enters your store URL and the code in their Partner Dashboard, chooses the permissions they need, and sends the request. You will receive an email notification, and the request appears on your Users page.
Step 3: Review and accept the request
- Go to Settings > Users.
- Click the Requests status to filter the list, then click the request.
- Review the partner details shown on the request, such as Partner since, Active collaborations and Request sent from. If the location says (possible VPN) and you were not expecting that, ask your partner before accepting.
- In the Roles section, review the auto-generated role (named like
Collaborator name x Store name). You can edit it, rename it or assign an existing role instead. - Click Accept request. To decline, click Reject request, which also removes the auto-generated role.
A few things to know about collaborators: they can’t be given the Administrator role, store ownership can’t be transferred to them, and they must have two-step authentication turned on to log in. Collaborator accounts also expire if they are not used for 90 days; you can bring one back by opening the user and clicking Actions > Reactivate user.
The full details are in the Shopify Help Center article on collaborator accounts.
How to remove a staff or collaborator account
When a project ends or an employee leaves, remove their access right away:
- Go to Settings > Users.
- Click the person’s name.
- For a collaborator, click Actions > Remove (organization stores) or click Remove collaborator name in the Remove collaborator account section.
- Confirm by clicking Remove.
Removing a collaborator is permanent; if you need them again later, they have to send a new request with your current code.
Common errors when adding staff or collaborators
The “Add users” button is missing
Your plan does not allow additional users, or you are not logged in as the owner or an Administrator. Upgrade the plan, or use a collaborator account if the person is a Shopify Partner.
The invitation link has expired
Staff invitations are only valid for 7 days. Remove the pending user and invite them again. Also ask them to check their spam folder.
The partner says the request code is invalid
You probably generated a new code after sending the old one. Copy the current code from Settings > Users > Security and send it again.
The collaborator can’t see a section of the admin
Their role does not include that permission. Open the user, edit the assigned role and add the missing permission, for example Themes or Apps. If you are setting up products together, my guide on how to add products and variants in Shopify shows which areas of the admin are involved.
You want to hand over the whole store
Staff and collaborator accounts never become the owner automatically. Ownership transfer is a separate process, and if you are winding the business down instead, read how to pause, close or delete a Shopify store.
Wrapping up
That’s it! Now you know how to add a staff account and how to add a collaborator in Shopify without ever sharing your owner password. Invite employees as users with only the roles they need, give Partners your 4-digit collaborator request code, review every request before accepting, and remove access as soon as the work is done.
If you have any questions or run into a different error while inviting users, feel free to leave a comment below and I will try to help.