
Running Magento 2 means taking care of servers, security patches, PHP upgrades and OpenSearch – work that many store owners would rather spend on selling. That is why a Magento 2 to Shopify migration is one of the most common re-platforming projects today. The hard part is moving products, customers and orders without losing data or the Google rankings you built over the years.
In this tutorial, we will learn how to migrate from Magento 2 to Shopify step by step: preparing the Magento store, exporting data, importing it into Shopify, rebuilding the storefront, creating 301 redirects to keep your SEO, and finally switching the domain.
Previously, I published a tutorial on how to upgrade Magento 2 to the latest version. If you are still deciding whether to stay on Magento, read that one first – this guide assumes you have decided to move.
Contents
- What can you move from Magento 2 to Shopify?
- Step 1: Audit and back up your Magento 2 store
- Step 2: Export products, customers and orders from Magento 2
- Step 3: Import data into Shopify
- Step 4: Rebuild the theme and store settings
- Step 5: Create 301 redirects to keep your SEO
- Step 6: Test and switch your domain
- Common errors
- Wrapping up
What can you move from Magento 2 to Shopify?
Before you start, it helps to know what moves easily and what has to be rebuilt:
- Can be imported: products (with variants and images), customers and their addresses, historical orders (with an app), URL redirects, blog posts and CMS pages (manually or with an app).
- Must be rebuilt: the theme, menus, shipping rules, tax settings, payment gateways, email templates and any custom Magento modules (replaced by Shopify apps).
- Cannot be moved: customer passwords. Magento stores passwords as hashes that Shopify can’t read, so customers sign in again on Shopify (with Shopify’s new customer accounts they simply receive a one-time code by email).
Shopify’s own migrating to Shopify guide recommends importing products first, then customers, then historical orders, and we will follow that order.
Step 1: Audit and back up your Magento 2 store
Start with an inventory of what you have. Write down the number of products (simple and configurable), categories, customers, orders, CMS pages and the extensions you rely on. For each extension, find a Shopify app or built-in feature that replaces it.
Then take a full backup of the database and the media folder so you can always go back:
cd /var/www/magento2
mysqldump -u magento -p magento2 > magento2-backup.sql
tar -czf media-backup.tar.gz pub/media/catalog/product
Step 2: Export products, customers and orders from Magento 2
You have two options: export CSV files yourself, or let a migration app pull the data directly.
Option A: Export CSV files from the Magento admin
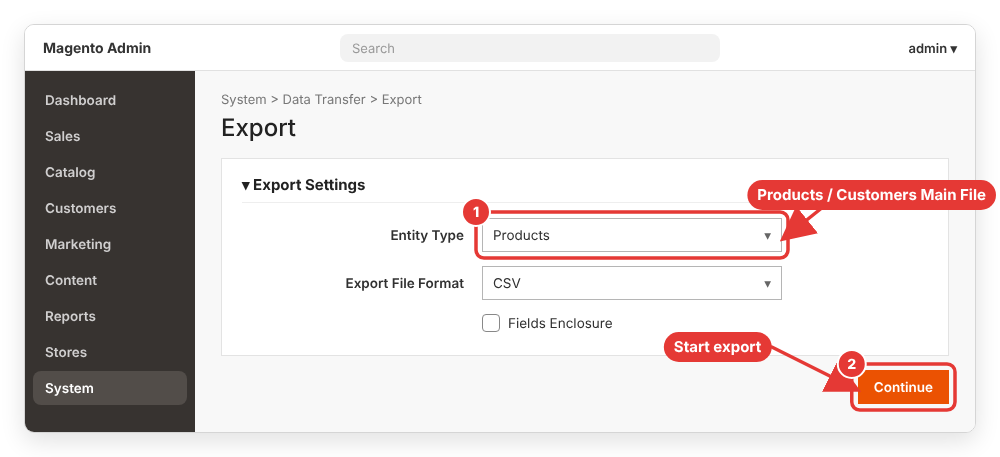
- In the Magento admin, go to System > Data Transfer > Export.
- Set Entity Type to
Productsand Export File Format toCSV. - Scroll down and click Continue. Magento queues the export (the cron job and the
exportProcessorconsumer must be running); the file appears in the grid at the bottom of the page when it is ready. - Repeat with Entity Type =
Customers Main Fileand thenCustomer Addresses.
I covered the customer export in detail in how to export and import customers data in Magento 2.
Important: Magento’s CSV format is not the same as Shopify’s. The Magento file uses columns like sku, name, description, price, qty, url_key, additional_images and configurable_variations, while Shopify expects one row per variant grouped by a product handle. You will need to map the columns to Shopify’s template (download the sample CSV from the Shopify import dialog) in a spreadsheet before importing. Image URLs must also be public links that Shopify can download.
Option B: Use a migration app
For stores with configurable products, thousands of SKUs or historical orders, a migration app is usually faster and safer. Apps such as Cart2Cart, LitExtension or Matrixify connect to Magento and create products, variants, customers and orders in Shopify for you, and most offer a free demo migration of a small batch. Note that Shopify’s built-in CSV import does not support historical orders, so if you need old orders in Shopify, you will need an app.
Step 3: Import data into Shopify
Create your Shopify store (a trial is fine) and import in this order:
- Products – go to Products and click Import, upload the CSV and check the preview before confirming. Tick the option to overwrite products with the same handle if you are re-running the import.
- Customers – go to Customers and click Import. Keep email marketing consent accurate; only mark customers as subscribed if they opted in on Magento.
- Orders – run your migration app.
After the import, open a few products and compare them with Magento: variants, prices, weights, images, SEO title and description. If you need to fix individual products, my guide on how to add products and variants in Shopify shows every field in the product editor.
Step 4: Rebuild the theme and store settings
Magento themes can’t be moved to Shopify, so pick a Shopify theme in Online Store > Themes and rebuild your homepage, collection pages and product pages. Then recreate the settings Magento handled:
- Navigation – recreate your Magento category menu in Content > Menus.
- Shipping – rebuild your table rates and free shipping rules in Settings > Shipping and delivery. See how to set up shipping rates in Shopify.
- Taxes, payments and checkout – configure them under Settings.
- Pages and blog posts – copy your CMS pages to Online Store > Pages and blog posts to Online Store > Blog posts.
Step 5: Create 301 redirects to keep your SEO
This is the step most migrations get wrong. Magento URLs look like /joust-duffle-bag.html, while Shopify uses /products/joust-duffle-bag and /collections/bags. Without redirects, every old link in Google returns a 404 error and you lose traffic.
First, export all product URLs from the Magento url_rewrite table:
mysql -u magento -p magento2 -e "SELECT request_path FROM url_rewrite WHERE entity_type='product' AND redirect_type=0 AND store_id=1" > product-urls.txt
head -4 product-urls.txt
wc -l product-urls.txt
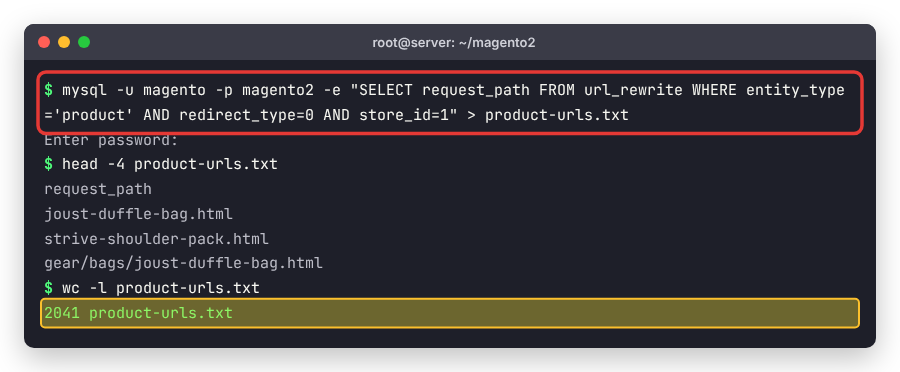
If your Shopify product handles match the Magento url_key values (they do when you imported url_key as the handle), you can turn this list into a Shopify redirect CSV with one command. Category URLs work the same way with entity_type='category' and /collections/:
echo "Redirect from,Redirect to" > redirects.csv
tail -n +2 product-urls.txt | awk -F/ '{h=$NF; sub(/\.html$/,"",h); print "/"$0",/products/"h}' >> redirects.csv
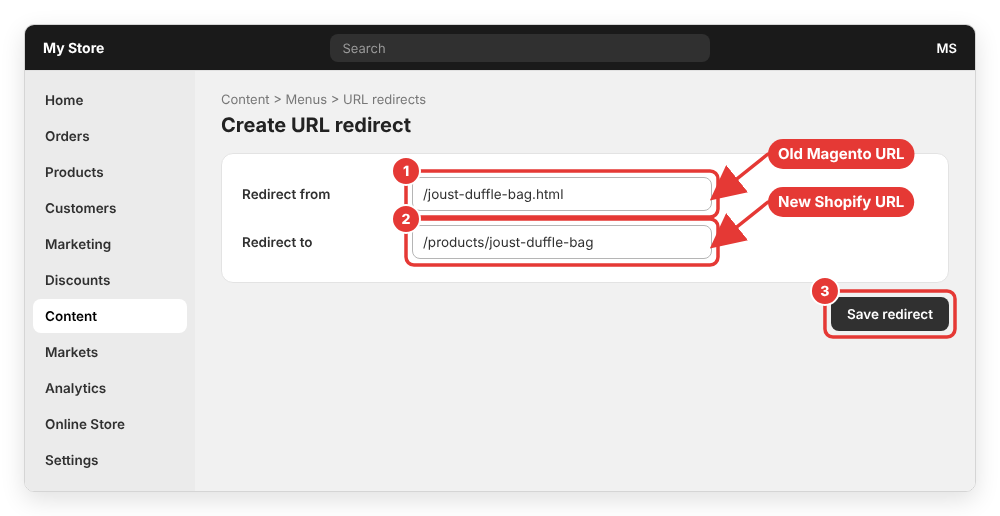
Then, in Shopify, go to Content > Menus, click View URL redirects and import redirects.csv. To add a single redirect by hand, click Create URL redirect, fill in Redirect from (the old Magento path) and Redirect to (the new Shopify path), and click Save redirect.
Step 6: Test and switch your domain
Before going live, place a few test orders (with a test payment gateway and a real one), check emails, and click through the most visited pages from your analytics. When everything works:
- Put Magento into maintenance mode so no new orders arrive on the old store:
php bin/magento maintenance:enable. - Run a final “delta” migration with your app to copy the orders and customers created since the first import.
- In Shopify, go to Settings > Domains, click Connect existing domain and update the DNS records at your domain provider.
- Remove the store password so the storefront is public, and submit the new sitemap (
/sitemap.xml) to Google Search Console.
Keep the Magento server and database backup for a few months in case you need to look up old data.
Common errors
Product import fails with “Validation failed” or images missing – the CSV still contains Magento column names, or the image URLs are relative paths. Map the columns to Shopify’s template and use full public URLs.
Configurable products imported as separate products – Shopify groups variants by handle. Every variant row must share the parent product’s handle, with option names and values filled in.
Customers can’t log in – this is expected because passwords can’t be migrated. Tell customers in your launch email that they need to sign in again.
Old URLs still return 404 – the redirect CSV paths must start with / and must not include the domain. Also check category URLs and CMS pages, not only products.
Magento export stays “in queue” – the export runs through the message queue. Make sure Magento cron is running, or start the consumer manually with php bin/magento queue:consumers:start exportProcessor.
Wrapping up
A Magento 2 to Shopify migration comes down to six steps: audit and back up, export data, import products, customers and orders, rebuild the theme and settings, create 301 redirects, then test and switch the domain. Take your time on the redirects and testing steps – they protect your rankings and your customers’ experience.
Are you planning to move your Magento store to Shopify, or have you already done it? Leave a comment below with your questions or the problems you ran into, and I’ll do my best to help.